Quantcast
Channel: Arcade Hacker
Viewing all 34 articles
Browse latest View live

Hello World

$
0
0
Welcome to Arcade Hacker, a personal blog about my experiences, research and curiosities on arcade gaming.

Just like many of you, arcade games were an integral part of my early years and marked my childhood in many unforgettable ways.

As an adult I continued the enjoyment thanks to the incredible work done by the Mame team, and by early 2014 got my hands on my first real arcade game pcb, my all time favorite Taito's Bubble Bobble. Many more game pcbs followed as well as endless learning and research about the arcade hardware and software world in general.

Thanks for ready and I hope you enjoy my articles.

Eduardo.


Capcom Kabuki CPU - Intro

$
0
0
What do games such as Pang, Cadillacs and Dinosaurs or Block Block have in common?


Yes, they are all Capcom titles, but what i'm referring to is this thing:

The Capcom Kabuki Z80 CPU

Manufactured by VSLI Technology Inc, the Kabuki is a security enabled Z80 cpu used extensively by Capcom during the late 80s and early 90s.

Kabuki uses a custom crypto implementation involving an internal memory with a set of decryption keys in combination with external encrypted roms. A 3.6v external battery keeps those keys from being lost when the game isn't being powered

The obvious issue here: lose the power source and you will lose your game. 

Why did Capcom produce and use Kabuki? The one and only reason was to combat bootleggers, a widespread business practice back then that saw countless game titles being copied and produced by alternative companies without any rights or payments going back to the original manufacturers.

The security feature in Kabuki presumably tried to make things difficult for bootleggers in order to avoid open and simple copies of games from being produced.  

But did Kabuki accomplish its mission? 

This is a question that's hard to answer since there's known copies of most if not all Kabuki powered titles, therefore one could say in full confidence that Kabuki did not fully prevent game copies from happening, but probably helped reduce the amount of companies and/or individuals able to produce them.

The effectiveness of Kabuki as a business investment is probably a retrospective financial question that needs to be made to Capcom itself.  For us, the collectors and researchers in the post arcade business era, Kabuki represents the two sides of a coin, a very important piece in the arcade history that we need to preserve, but also a limitation to overcome in order to preserve fully working game titles today.

According to the Mame team this is the list of Capcom games known to use Kabuki:

Adventure Quiz 2 Hatena ? no Dai-Bouken  
Ashita Tenki ni Naare    
Block Block                            
Buster Bros
Cadillacs and Dinosaurs           
Capcom Baseball   
Capcom World              
Dokaben   
Dokaben 2
Mahjong Gakuen 2 Gakuen-chou no Fukushuu 
Pang 
Poker Ladies  
Pomping World 
Punisher                           
Quiz Sangokushi             
Quiz Tonosama no Yabou   
Slam Masters     
Super Buster Bros 
Super Marukin-Ban   
Super Pang (Japan) 
Super Pang (World)
Warriors of Fate                   
           
All these games use Kabuki as the main game cpu except for Cadillacs and Dinosaurs, Punisher, Slam Masters, and Warriors of Fate. These four titles use Kabuki only as the sound cpu in Capcom's patented Q-Sound technology. 

This blog post is the first one in a series of Kabuki articles that will analyze this security cpu in full detail, and share my research work and findings that successfully allowed me to reverse engineer this cpu and bring any dead Kabuki games back to life unmodified. 

What this means to you and the rest of the arcade community is full preservation of all Kabuki powered games as fully working factory originals.

You can read the next articles in the series here:


  • Part 1
  • Part 2
  • Part 3
  • Part 4
  • Part 5

  • Capcom Kabuki CPU - Part 1

    $
    0
    0
    Welcome to the second post in the Kabuki series of articles analyzing this security cpu in detail. If you haven't you can read the previous post here.

    Who made Kabuki?

    Kabuki was manufactured by VLSI Technology Inc, also known as VLSI or VTI, a company which designed and manufactured custom and semi-custom ICs. 

    I assume their company name originated from the term "Very Large Scale Integration", a term referring to design and fab processes for the integration of hundreds of thousands of transistors into an IC.

    According to Wikipedia, VLSI was an important pioneer in the electronic design automation (EDA) industry. It offered a sophisticated package of tools, originally based on the 'lambda-based' design style. VLSI no longer trades as it got acquired in by Philips in 1999.


    During my investigation and using social networks I did reach out to several ex-employees, and was lucky to make contact with a person who ran operations within VSLI at the time Kabuki got manufactured (1987/88).

    This person confirmed that the company had a Z80 product in their portfolio and remembered the company had designed and manufactured ICs for several Japanese game vendors. He referred to their Z80 as a "megacell" family product.


    Cells and Megacells

    One of the two popular design processes for semi-custom chips is known as cell technology. Back in the 80s VSLI Technology Inc became one of the early vendors of cell based semi-customs.

    Think of cell based design as the way of defining primitive logic functions (AND, OR, XOR....) into a library for reusing and combining as many times as required in different designs via CAD design tools.

    A standard cell NAND gate


    According to VTI documentation from 1986, "Megacells" consisted in far more complex products than standard cells, just imagine a whole chip or controller design converted into cell format for combined usage with other cells.


    The VTI Z80 product was one of those megacells available as part of the VMC10 and VMC100 Series, 2-Micron and 1.5 Micron Advanced Megacell Family:

    Portion extracted from a 1988 VTI megacell catalog

    Besides Kabuki, VTI did more semi-custom Z80 products for other companies, here's an example of one found inside a music instrument, the SCI Multi-Trak:

    VTI Z80 semi-custom. Photos taken from www.tauntek.com/SCIMultitrak.htm


    Kabuki CPU vs the standard Z80

    Kabuki's main difference to any standard cpu is the lack of Dynamic Memory (DRAM) refresh. Standard Z80 cpus feature DRAM refresh on pin 28 that helps using dynamic memories with the same ease as static memories.

    Dynamic memories consist of tiny capacitors requiring constant refreshing in order to preserve memory contents. The Z80 helped overcome this problem by offering an integrated memory refresh facility that simplified designs and reduced overall cost by requiring far less external circuitry.

    Instead of featuring a memory refresh service, Kabuki uses pin number 28 as a power supply input directly related to its security features. Losing power on this input causes a loss of internal data inside the chip and bricks your game.


    What this also means is that Kabuki cannot be used in systems that feature dynamic memories, at least not without the aid of external circuitry. 

    One particular interesting behavior of Kabuki is that leaving pin 28 low or unconnected turns it into a standard Z80 cpu. A clear indication that whoever designed Kabuki wanted it to also be useful as a regular cpu.

    Designing and manufacturing your own customized cpu is a very expensive business,  having the option to reuse Kabuki as standard Z80 stock could have made complete financial sense to Capcom back then. 

    We now know Kabuki has physical differences, but what about at code level? Is Kabuki a fully compatible Z80 class cpu? 


    Z80 Compatibility

    Wondering how compatible Kabuki is, I hooked it into my old Amstrad CPC 6128 (uses a z80 too) and turned it on without any surprises. The computer worked and seemed to do its job without any issues.

    Next was running Zexall, a powerful application commonly used by developers of Z80 emulators to test for emulation compatibility issues. Zexall is a great program that runs all posible Z80 instructions and reports any issues found. 


    No surprises here either, running the Z80 Exerciser for several hours revealed no issues whatsoever. To all effects, at code level Kabuki is a fully compatible Z80 cpu. 


    How Kabuki works

    Thanks to the great work done by the Icer Addis and later the Mame team, Kabuki's encryption scheme is known and all games successfully emulated. It works by performing a series of bit operations consisting of bit swaps, bit rotations and xors.

    The exact method as described by the mame driver:

    "The base operation is a bit swap which affects couples of adjacent bits.
    Each of the 4 couples may or may not be swapped, depending on the address of
    the byte and on whether it is an opcode or data.
    bitswap -> ROL -> bitswap -> XOR with a key -> ROL -> bitswap -> ROL -> bitswap
    - if the byte is an opcode, add addr_key to the address
    - if the byte is data, XOR the address with 1FC0, add 1, and then add addr_key"

    The keys involved in the process are as follows and each game has a different key set:
    • For example, decode keys used by Pang:
      • Bitswap key #1 0x01234567
      • Bitswap key #2 0x76543210
      • Address key 0x6548
      • XOR key 0x24

    Putting Kabuki under the logic analyzer revealed that at a physically level Kabuki must see or control at least the following cpu lines:

    • All data inputs, D0 through D7
      • Needed in order to see and decode data.
    • All address lines, A0 through A15.
      • Each byte decodes differently depending on the address.
    • The RFSH "refresh" line
      • Used as power input to maintain internal memory contents. When low makes Kabuki behave as a standard Z80.
    • The M1 line
      • Necessary in order to know when an op code or data is fetched. Kabuki decodes Op code bytes differently than Data bytes.
    • The RD "read" line
      • Needed to know when data read operations occur. Kabuki does not interfere with write operations, only decodes, does not encode.
    • The IORQ or MEMREQ line
      • Kabuki must know when IO operations occur as it does not interfere with IO reads or writes.


    Kabuki being analyzed with a multi channel logic analyzer

    The important questions

    Question #1
    What happens after Kabuki has lost power and its memory contents gone? After all memory is memory and it must return to a known state.  Do all decoding keys go back to 00? or perhaps FF? 

    Question #2
    How did Capcom program Kabuki? It's obvious that someone had to program each cpu during game manufacturing. 

    Did they use an external programer attached to each cpu? This approach would require special logic inside the cpu and the manufacturing additional hardware (programming devices).

    Did they use a special rom containing programing code?  This approach sounds the easiest from a manufacturing point of view, plug a rom, power the board and done, the cpu has been programmed. 

    This last method would also imply a lot of complex custom cpu logic (eg: instruction decoding etc...) and use unused Z80 opcodes, we already know Kabuki is full Z80 compatible.

    Question #3
    Is it even possible to reprogram it? Some security ICs feature physical protections such as security fuses burned after programing. 


    This is all for this week, thanks for reading and stay tuned for the my next post: A software attack on Kabuki.

    Capcom Kabuki CPU - Part 2

    $
    0
    0
    Welcome to the third post in the series, you can access the previous posts here:

    A Software Attack on Kabuki

    As explained on part one, Kabuki presumably uses an internal memory where it keeps the keys used for program and data code decryption. We know this from the fact that whenever the cpu loses power input on pin 28 those memory contents are lost and the cpu stops being able to run games, forever.


    But let's look for a minute at what's going on here...


    If Kabuki uses an internal memory for storage then this storage must be of CMOS type, thanks to one of the manufacturer product catalogs (VTI) we already know that the Kabuki Z80 core is a CMOS part.


    In theory bits of CMOS memory or registers must default to an specific value after a power loss has occurred. Normally this should be 0, but let's play and get wild by assuming internal inverters are at work and the memory output default value could also be 1. 


    In either case, and unless the designers of Kabuki randomized ram/register contents as part of a paranoid approach, then we could be in safe grounds when assuming that Kabuki's ram must get back a known state after a power loss has occurred. 


    Could we try running code encrypted with keys whose bit values are all 0's or 1's? Could recovering a dead Kabuki game be so simple just requiring the burning a new set of roms encrypted with those default values? 


    Let's look into this.


    Planning the Attack


    First of all, if we want to run code encrypted with different keys then we must know how to encrypt new valid code. Thanks to Icer Addis and the Mame team we know how to decode code for games using Kabuki but as expected, not a word about encoding code as it has never been a need to emulate existing games.


    Secondly, we will need a piece of Z80 code that allows us to validate the experiment. Creating a "Hello World" piece of code that works on Capcom hardware is a project on its own. 

    Writing a Hello World


    Pang rom "Hello World" code running under Mame 


    Digging around Pang and using an standard disassembler I produced the following code that creates a functional Hello World test, the unencrypted code works perfectly under Mame by replacing rom number 6:


      .data:0x00000000f3di
      .data:0x00000001ed56im 1
      .data:0x000000033e00ld a,0x00
      .data:0x00000005d302out (0x02),a
      .data:0x000000073e40ld a,0x40
      .data:0x00000009d300out (0x00),a
    ; char* src = arg[1]
      .data:0x0000000b213cd8ld hl,0xd83c
      .data:0x0000000e011eccld bc,0xcc1e
      .data:0x00000011112500ld de,0x0025
      .data:0x000000141ald a,(de)
    ; dst[i] = c
      .data:0x00000015a7and a
      .data:0x00000016ca0000jp z,0x0000
      .data:0x0000001977ld (hl),a
      .data:0x0000001a2cinc l
      .data:0x0000001b3600ld (hl),0x00
    ; while (c != 0)
      .data:0x0000001d2cinc l
      .data:0x0000001e3e10ld a,0x10
      .data:0x0000002002ld (bc),a
      .data:0x0000002113inc de
      .data:0x000000220cinc c
      .data:0x0000002318efjr 0x0014
      .data:0x0000002548454C4C4F21HELLO!


    Encrypting Kabuki compatible code

    Now the harder part...

    We need a set of tools to allow us encrypt our program, I won't get into much detail but writing the encoder required hard work (thanks to ASR and DR for the help) and I ended creating the following programs:

    Kabuki Encode- Encrypts a file with a set of keys. Generates separated encrypted opcodes and data as required by Kabuki.
    Kabuki Decode - Decrypts a Kabuki encrypted file using a set of keys provided.
    Masker- This tool mixes encrypted opcodes and data generated by Kabuki Encode, takes a mask file as input.

    Use this link to download a zip file including source code, binaries compiled for Mac OS, and also the Hello World program shown above. 

    All three programs present a help output when ran with no arguments:

    ./kabuki_encode
    Kabuki Encode by Eduardo Cruz http://arcadehacker.blogspot.com

    usage: ./kabuki_encode <inputfile_opcode> <inputfile_data> <outputfile_opcodes> <outputfile_data> <baseaddress> <lenght> <swapkey1> <swapkey2> <addresskey> <xorkey> Optional: <numberofbanks>


    In order to produce valid encrypted code for our Hello World test program we first need to encrypt it using Kabuki Encode by running the following command:


    ./kabuki_encode helloworld.bin helloworld.bin helloworld.bin_opcodes helloworld.bin_data 0x0000 0x30 0x00000000 0x00000000 0x0000 0x00 0
    Wrote 48 (0x30) bytes

    As you can observe in the example above all keys are intentionally set to 0, this is because we want to test if Kabuki's default keys after losing power default to 0.

    Kabuki Encode has created for us two different files "helloworld.bin_opcodes" and "helloworld.bin_data". Kabuki handles opcodes and data bytes differently and this requires different encryption for both as explained on my previous post. 

    Next is merging the resulting opcode and data files. 

    This is when the tool Masker becomes handy, it helps us merge the files generated by Kabuki Encode into a single file, but before being able to use it we need to create a mask file that will tell Masker how the final resulting file should be combined.


    Mask file for Hello World

    Notice the file is full of FF and AA bytes, FF tells Masker to place on that position a byte from the opcode encrypted file, and AA tells it to place a byte from the data file instead. A mask file needs to be created manually and this requires that you know your program, you need to differentiate opcodes from data bytes (arguments of opcodes are data bytes too).

    Let's run Masker:


    ./masker helloworld.bin.mask  helloworld.bin_opcodes helloworld.bin_data  helloworld.bin.final

    Wrote 48 (0x30) bytes

    Finally we have our final encrypted code "helloworld.bin.final". This is now ready to burn into a 27256 type eprom and off to test it on a real Pang board.


    Hello World, the results

    With a great amount of excitement I tested this new code encrypted with encryption keys set to 0 but I was soon faced with a reality check, it didn't work... and the same went for code tested with all encryption bits set to 1. A total fail.

    Back to the drawing board

    What could be going on here? Our encrypted code is totally valid and Mame is able to run it. Could there be differences in the real hardware vs the Mame emulation? We are clearly missing something here...

    Time to go back to hardware and plug the logic analyzer, we need to understand exactly what's going on with Kabuki. This time we will use the original roms of the game Pang to understand the running differences of the real hardware in encrypted (pin 28 high) and non encrypted mode (pin 28 low). 

    Using the method described before and with the help of our new tools I created a Pang romset encrypted with all bits set to 0 and ran it.


    Pang code running encrypted on the left and unencrypted on the right

    The Z80 code shown above represents a timeline of execution, the program starts at 0x58 and first takes the order to call/jump to a different code location (0x13A), before doing so it stores the address of the byte that it was supposed to execute next if there wasn't such call/jump order (0x5B).

    After that it continues at the call address 0x13A and soon encounters an order to return back at 0x13E. The program recovers the address where it should execute next from the stack: 0x5B.

    In the case of Kabuki running unencrypted (right side) the address recovered, 0x5B, is interpreted correctly as 0x5B. Kabuki running encrypted mode (left side) also reads 0x5B but it interprets wrongly as 0xAD therefore returning code execution to a wrong place.

    Bingo! As identified with the help of a logic analyzer we can see that our suicided Kabuki (left side) is trying to decode memory ram reads and not just rom reads... What this means is that any bytes stored in memory during execution are handled as encrypted bytes when read back. This causes all programs that use memory to malfunction.

    The good: This finding explains why our Hello World didn't work and confirms that indeed Kabuki defaults to 0 all encryption keys when suicided. 

    The bad: We have hit ourselves with a massive stop wall... There's a new element at play not taken into account before, Kabuki must feature an additional configuration setting inside its memory that decides when to decode and not to decode byte reads, this setting probably sets which address spaces must be ignored eg: do not decode anything from 0xC000 to 0xFFFF (Pang's ram space). 

    When Kabuki suicides besides losing the encryption keys it also loses this address decoding setting and leaves the cpu practically unusable. With this discovery our dream to recover dead Kabuki games with new rom code is vanished, but we have just lost a battle, not the entire war.

    This is all for this week, thanks for reading and stay tuned for my next post in the Kabuki series: A better Pang desuicide.

    Capcom Kabuki CPU - Part 3

    $
    0
    0
    Welcome to the fourth post in the Capcom Kabuki reverse engineering series, if you missed any of the previous readings you can find them here:

    A Better Pang Desuicide

    Are you familiar with this mess?


    If you do then it means that at some point you have desuicided some sort of arcade game, most probably a Capcom title.

    To me this is actually how this journey started the day I got hold of a dead Capcom/Mitchell Pang game motherboard. Like many of you went straight to the usual arcade forum and asked the community for advice, and this is when you most probably got introduced to the Dead Battery Society website.

    Yup, you have a look and it seems like you can get you game to work by doing X, Y and Z, hack your board, add new pieces, cables and even cut physical tracks and a few other tricks.

    The Dead Battery Society web page

    The result? You have a working game but not the original thing anymore, you required tools, skills, and the whole process isn't exempt of the risk of damaging your game. To some people this is ok but I don't think anyone can deny the appeal of having truly original hardware in our hands and the pain involved in having to hack our boards, we are passionate collectors after all.

    Refusing the idea of having to do this with my own suicided Pang board I went on and researched for better ways of reviving Kabuki powered game titles.

    As your know from the previous post I explored the effort of trying to take control of Kabuki via software, something that successfully allowed me to identify what happens inside Kabuki when the battery runs out, but also led me to the discovery that something else than just the encryption keys prevents us from reviving the games with software alone.

    The next logical frontier was planning a hardware attack, a lengthy, skillful and complicated process that requires plenty of education and preparation. But in the meantime and with the help of some of the tools created for the software attack on Kabuki I went on and decided to make a simpler Pang desuicide method.

    Pang playing in the Barcelona stage, my hometown. And no, there isn't such river in front of the Sagrada Familia ;)


    The Existing Desuicide Method

    The current popular desuicide method described by the Arcade Battery Society requires an important amount of tools, installing new double size roms as well as wiring, soldering, and forcing Kabuki in Z80 mode, etc... This existing hack exploits the fact that game unencrypted code can be obtained thanks the efforts of Icer Addis and the driver incorporated by the Mame team. 

    The requirement for double size roms comes from how Kabuki's encryption operates, if you remember from previous posts, Kabuki features different encryption for Opcodes, than Opcode parameters and Data.

    I won't get into much detail but knowing where exactly each byte goes into is a very difficult task and the only way of knowing so is by following the program execution byte by byte as it gets interpreted by the cpu. 

    For this reason existing hacks require two unencrypted sets of the same data, one that has been processed with the decryption for Opcodes, and another set that has been processed with the decryption for Data and Opcode arguments.

    The way this is put together is by using half of the double size rom for the first unencrypted data set and the second half for the data second set, all is then wired together to the higher address pin of the double size roms and the M1 signal of the Kabuki in Z80 mode or any other Z80 replacement compatible cpu.

    The M1 pin of Z80 compatible cpus signals when the cpu is reading an Opcode, or an Opcode parameter or Data. This signal is the key to the hack as it allows us to know with digital precision what data to serve the cpu as M1 goes high or low.

    A typical Pang desuicide

    A way of simplifying this process both in the resources and skills required is to obtain a valid unified unencrypted set that fits into the original roms. Let's look into it.


    Hands on

    Using a similar approach to what I explained on my previous post with the software attack, we need a Pang mask file that can help us produce the definitive rom set. Think of a mask file as a map that tells us where Opcodes and Opcode arguments and Data should be places on a rom

    Pang program roms consist of two roms labeled as Rom 6 and Rom 7. Number 6 is a 32k byte (256k bit) rom, and number 7 is the larger rom with 128k (1024k bit) worth of code.  In total combined they feature 160k bytes. 

    Trying to trace 160k bytes worth of program code can be almost mission impossible if we tried to do this manually, so we must get an ally on our side that helps us speed up the process as much as possible, and this where once again Mame becomes a god sent. 

    Mame features a collection of CPU drivers that emulate a variety of platforms, and among them the Z80 cpu, we can use these drivers to help us achieve our goal by modifying them to get the data we need as is processed by the emulated cpu.

    Mame source code files - the Z80 driver

    In my case what I wanted is to simply be able to modify the Z80 driver to fast track the identification of all opcodes and data bytes within the Pang code, and the best of all, you get this data by playing the game!

    The way this is done, is by hacking the existing Z80 driver code and incorporate new code parts needed for dumping the mask information we seek. For example the different read types performed by the cpu:

    case1: byte8[0] = 0xFF; break; /* op code */   <--- Writes an 0xFF when the cpu reads an opcode
    case2: byte8[0] = 0xAA; break; /* op code argument */  <--- Writes 0xAA when data is read 
    case7: byte16[0] = 0xAAAA; break; /* op code argument16 bits */ <--- Etc...
    case3: byte8[0] = 0x22; break; /* memory read */
    case4: byte8[0] = 0x55; break; /* memory write */
    case5: byte16[0] = 0x2222break; /* memory read16 bits */
    case6: byte16[0] = 0x5555break; /* memory write16 bits  */

    Or also assembling the rom bank structure used by the game, a fundamental part of the Kabuki encryption scheme:

    case0: PC = PC - banked_region[0]; break; /* 00000-03fff */
    case1: PC = PC - (banked_region[0] /2); break; /* 04000-0bfff */
    case2: ; break; /* 8000 - bfff */
    case3: PC = PC + (banked_region[0] /2); break; /* 0c000-0ffff */
    case4: PC = PC + (banked_region[0]); break; /* 10000-13fff */
    case5: PC = PC + (banked_region[0] *1.5); break; /* 14000-17fff */
    case6: PC = PC + (banked_region[0] *2);  break; /* 18000-1bfff */
    case7: PC = PC + (banked_region[0] *2.5);; break; /* 1c000-1ffff */

    In summary, what we do with this modified driver is tap on all the interesting cpu operations, and the most tricky part is making sure we trap all opcode arguments correctly as they can get a bit complex (remember, opcodes and arguments and encrypted differently).

    In order to use the driver we must recompile Mame and execute it with our favorite z80 powered game. While you play the game the driver saves to disk all the byte information on two separate files, z80.log (the main code region 0x0000-0x7FFF) and z80-banks.log (a dynamic region consisting in 8 banks in the 0x8000 to 0xBFFF region).

    Portion of Pang's rom 6 mask file produced with Mame

    Here's a copy of the modified Z80 driver, feel free to hack it and reuse it as much as you want and sorry for the lack of programing "etiquette", i'm just an amateur not a pro coder. Remember that it probably requires modification if to be used with games different than Pang or Buster Bros. It should compile fine as part of Mame 0.153.

    Once we have played the game extensively, all screens, both single and two player.... and used all options available we should have a very consistent set of mask files that should be ready to put to test by using Masker, the program I shared on my previous post. Using Masker we can input both unencrypted (opcode and data) files together with the mask files produced by our Mame driver and get a final single romset that fits the original roms and requires not motherboard hacking.

    Truth is this isn't as easy as playing and having all the work done, extensive testing and manual finishing of rom areas never accessed by the game program is necessary and this requires understanding of the byte-code, dedication and a considerable time investment. Consider this process mostly a handcraft.


    Pang - The Unencrypted set

    And here's the result, a complete functional unencrypted romset of Pang, click to download. 

    What this means is you can get back to life your suicided Pang games by simply burning new code on the existing roms and not having to use new eprom pieces, wiring or hacking your board. 

    The only requirement besides burning the new code is that you leave Kabuki's pin 28 hanging outside of the cpu socket unconnected (ignore this if your board is already desuicided and no power is being supplied to pin 28).

    Pin 28 overhangs the cpu socket so it doesn't make contact


    Next week

    Thanks for reading and stay tuned for what's coming next week: A hardware attack on Kabuki. At this point in time i'm not entirely sure how many more posts  I will dedicate to Kabuki but expect at least one more fully dedicated to a journey under the microscope and exposing its reprograming secrets.

    Until that time comes here's nice teaser of what's coming, enjoy and thanks again for following.

    Kabuki under the microscope


    Capcom Kabuki CPU - Part 4

    $
    0
    0
    Welcome to the fifth post in the Capcom Kabuki reverse engineering series, you can find any previous posts over here:

    A Hardware Attack on Kabuki

    Ready for a journey under the microscope? This week's post is a video, let's dive in and see who really Kabuki is.


    Liked the video? See the next and final part here: Reprograming Kabuki


    Capcom Kabuki CPU - Part 5

    $
    0
    0
    Welcome to the sixth and final post in the Capcom Kabuki reverse engineering series, you can find all previous posts here:

    Reprograming Kabuki

    Last week's journey under the microscope gave us a better understanding of all the Kabuki internals. In this week's final post we will learn all of its reprograming secrets. 


    Kabuki is no longer a secret, thank you for watching and I hope you enjoyed this journey as much as I did. See you again in 2015!


    Capcom Block Block desuicide - Kabuki Programmer

    $
    0
    0
    Video demonstrating the reprograming of a suicided Capcom Block Block arcade game motherboard.


    I LOVE this community

    $
    0
    0
    Just wow guys, the reaction to the Kabuki Reverse Engineering series has been extraordinary, and I want to thank you all for being such a great and devoted community. The arcade family is one of a kind.

    During the last weeks I got contacted by great individuals that not only praised and recognized the work on Kabuki but also offered help as well as valuable information on new intriguing challenges. All of this activity has lead to countless discussions on undefeated security systems, such as the Sega FD, Capcom's CPS1, CPS2, and the CPS3.

    I'm sure this great momentum will not be wasted so expect further news from my end soon.

    Great stories ahead.

    Announcing Sega's FD1094 Reverse Engineering

    $
    0
    0

    Dear all, it is my pleasure to announce the beginning of Sega's FD1094 reverse engineering effort. As it was with Kabuki, the main goal is to understand the programing secrets of this security processor featured in plenty of arcade games developed by Sega.

    After having spent some time studying it, I firmly believe Sega's FD is probably one of the more complex and beautiful chips ever designed.

    Stay tuned.

    ps: If you hold a stash of FD1904 & FD1089 cpu's please consider donating any spare units to the cause, contributions welcome.

    Kabuki Presentation PDF

    Capcom CPS1 Announcement

    $
    0
    0
    Dear all, i'm very happy to announce the successful reverse engineering of the CPS1 security enabled custom PPU, also known as CPS B-21.

    CPS1-C board with battery backed B-21 custom IC

    What this announcement means for the arcade community is full preservation of CPS1 systems enabled with security, without the need to modify hardware or rom code.

    Details about the reverse engineering process, milestones, and full disclosure of the custom IC programing method to follow during the coming days.

    Thanks all for reading and supporting this project.

    Capcom CPS1 - Part 1

    $
    0
    0
    For most of the 80's, arcade titles were the product of intense hardware and software custom design work. With every new game title came a new board design and the full dedication of multiple specialized teams including experts in hardware, electronics, software, game design, graphics, sound... the list goes on and on.

    Competition, faster release cycles, and the need for continued improved financial results, drove arcade manufacturers into operational optimization and standardization efforts with the ultimate goal of focusing into their true core business: producing successful video games, not hardware.

    With the introduction in 1988 of the Capcom Play System 1 (CPS-1) by Capcom, the company signaled a new era in game design quality and hardware platform maturity.

    An original CPS-1 Street Fighter II CE kit from my personal collection

    The CPS-1 system was Capcom's bet in standardizing its own game release cycle, and the new system gave birth to 32 new game titles, about 137 if we count in game revisions and market specific localized versions. Its 16 bits and extended capabilities served as publishing vehicle for successful franchises such as Capcom's worldwide hit: Street Fighter II.

    According to one release flyer from the UK distributor Electrocoin, the new system took 2 years to develop and a total investment of $5,000,000 USD ($10 million in 2015 money). But take this information just as a reference, the flyer happens to be full of marketing driven inaccuracies such as the claim about the system containing three 68000 cpu cores... (Thanks Haze for the finding).

    Electrocoin UK CPS-1 advertisement. Source: arcade-museum.com

    In production for a total of 12 years (1988-2000) and 6 known revisions, CPS-1 is probably one of the most successful hardware platforms in the history of the arcade industry and Capcom's first truly modular/reusable system. The reach of CPS-1 even includes a failed attempt to penetrate the home video game market.

    CPS-1 the detail

    The design consist of a number of interconnected pcbs known as A, B and the later added C board and Q-sound board. Here's a description of each layer:

    • A: the base board containing most of the system hardware. eg: cpu, memory, sound, etc...
    • B: the game rom board containing a combined number of mask roms and/or eproms.
    • C (later added): an small satellite board containing a video logic custom chip, and sometimes additional IO.
    • QSound (later added): a full size intermediate board providing new sound capabilities, the board is sandwiched in between A and B.

    Note: C board was introduced right after the two initial game releases: Forgotten Worlds & Ghosts and Ghouls, and wasn't part of the original CPS-1 design. Instead, its contents were an integral part of the B board.

    CPS-1 Technical specs: (source: Wikipedia)

    • CPU
      • Primary: Motorola 68000 @ 10 MHz (some later boards 12 MHz)
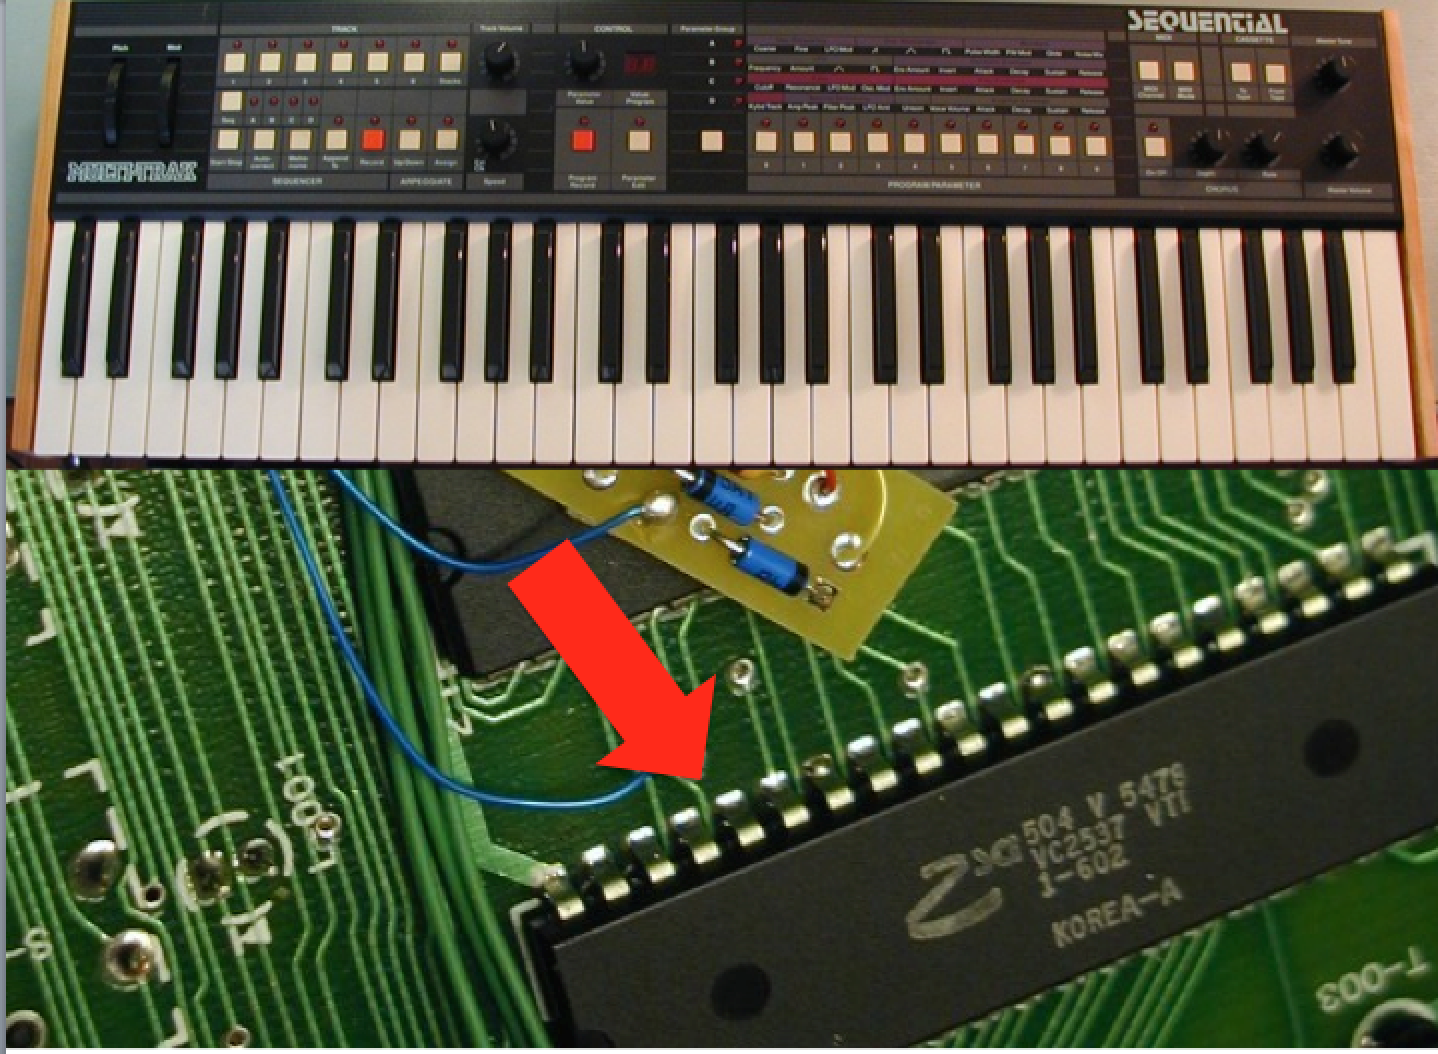
      • Secondary: Zilog Z-80 @ 3.579 MHz
    • Sound Chips:
      • Yamaha YM2151 @ 3.579 MHz
      • Oki OKI6295 @ 7.576 MHz, Stereo
    • Display
      • Resolution: Raster, 384x224 @ 59.6294 Hz
      • Color Depth: 12 bit RGB with a 4 bit brightness value
      • Colors available: 4096
      • Onscreen colors: 3072 (192 global palettes with 16 colors each)
    • Sprites:
      • Simultaneously displayable: 256 (per scanlines)
      • Sizes: 16x16, max. 16 colors (15 unique + 1 transparent)
      • Vertical and Horizontal Flipping capability
    • Tiles: Sizes 8x8, 16x16, 32x32 with 16 colors (15 unique + 1 transparent)
    • Tile Maps: 3 Maps, 512x512, 1024x1024, 2048x2048 pixel
    • 68K RAM: 64 KB WORK RAM + 192 KB VRAM (Shadow)
    • PPU: 192 KB VRAM + 16 KB CACHE RAM
    • Z80 RAM: 2 KB WORK RAM

    CPS-1 evolution

    The CPS-1 platform went through five clear differentiated evolutionary phases. The first release of the platform consisted only of a two layer design which missed what we know today as the C board.

    1988 Forgotten Worlds 
    A two layer design with QFP soldered mask roms.

    CPS-1 launch title Forgotten Worlds. Photo by James Greenhalgh.

    1989 Strider 
    A three layer design introducing the top C satellite board. QFP mask roms are gone, uses standard DIP roms instead. This modern layout stays for most of the CPS-1 lifetime.

    CPS-1 Strider. Photo taken from arcade-system.com

    1991/92 Street Fighter II Champion Edition 
    The system gains a 20% speed bump by increasing the system frequency from 10Mhz to 12Mhz. With SF II the C board features additional IO for the extended game controls (6 buttons per player).

    Street Fighter II Champion Edition board


    1992 Capcom World 2
    Some CPS-1 releases are enclosed inside a partial soft case including a title marketing sticker. The system features the same three layer design.

    Capcom World 2 enclosed in a soft case

    1993 Warriors of Fate
    Updated CPS-1 design known as CPS Dash (or CPS 1.5). Four layer design featuring a new intermediate QSound board. All enclosed inside a hard case that includes an internal fan. This is the final update to the CPS-1 platform.

    CPS (1.5) Dash hard case with QSound for the game Warriors of Fate.

    This last update also saw a failed attempt of marketing CPS Dash as a home videogame system. The system was known as Capcom Power System Changer. Below is an original mailer about the system and its accessories:

    Capcom Power System Changer. Photo taken from therealundamned.blogspot.com

    CPS-1 the customs

    One of the many milestones of CPS-1 is probably the reduction in the dependency of TTL chips, a family of logic chips widely used in the arcade video game industry since its very beginnings. With the introduction of CPS-1, Capcom also introduced a number of custom ASIC chips bringing new system capabilities, as well as a significant reduction in board density and complexity.

    An ASIC is basically a custom chip built on request to meet a certain specification. In basic terms think of it as a relative easy way (if you have the required upfront investment capital) of integrating many off the shelf logic parts into just one.

    A couple of these custom chips found in CPS-1 are the video logic ASICs known as A-XX and B-XX.

    Left: CPS custom B. Right: CPS custom A


    Rather than being mission specific, these chips do combine several video functions (scrolling, layer controls, palettes, memory transfers, etc... ) and as you can see in the photos above both came in high IO density QFP chip packages.


    The strange case of COMCO

    One good story about these customs is the apparent existence of a full A-01 custom clone under the comical brand "COMCO". Did anyone back then leak, sold, or steal the designs of this chip from Capcom? Or perhaps someone in the 90s embarked into fully reversing it? Whichever the case, who did it was resourceful enough and had the investment capacity to successfully reproduce and manufacture working clone parts.

    Left: COMCO A-01 clone. Right: CAPCOM A-01 original part. 

    I find this particular story amusing and believe it deserves a future investigation. Thanks to Fabrizio (Caius) for exposing the existence of the clone.

    CPS-1 security

    The overall reason for the existence of the C board is copy protection. The B-XX custom was manufactured with a different unique internal configuration in almost every new game, preventing operators from simply changing roms from title to title. Eg: converting old dated games into new releases without the right.

    With the release of the game "Three Wonders", custom B-XX underwent its last known revision (B-21) which saw the introduction of an on-chip internal memory backed by an external battery.

    CPS-1 C board with custom revision B-21. Battery shown on the left.

    This custom component gave Capcom the ability of having a dynamic internal configuration without the need to update and build new B-XX custom chips with every release, an operational optimization that most probably simplified Capcom's life and introduced long term savings on production cost.

    The long term consequences of this practice? Lose the battery, lose the game. As discussed earlier this practice probably helped Capcom with stopping plain and simple piracy attempts. But did this stop professional bootleggers? Clearly not as we know today CPS-1 and its army of hit games have been cloned to infinity.

    On the positive side the perceived survivability of the B-21 battery is strong. The custom is known to hold for an impressive number of years on its original battery, most have survived 20+ years and many even still go on today. In any case, for us collectors in the post arcade industry era, this battery backed chip represents a problem to overcome in order to keep working unmodified originals of our CPS-1 titles.


    CPS-1 the challenge

    With the idea of uncovering the CPS-1 B-XX custom secrets and providing the arcade community with complete control over their hardware, I teamed with the almighty Digshadow and went ahead on a quest to reverse engineer this mysterious chip.

    What's inside CPS-1 B-21? Who manufactured it? Can it be desuicided and reprogramed? To our satisfaction all of these questions (and more) already have an answer. During the next coming days a series of articles will provide you the insights and full disclosure on all of the B-21 custom secrets. Ready to discover what Capcom didn't want you know?

    Stay tuned.

    Update: Part 2 now available

    Capcom CPS1 - Part 2

    $
    0
    0
    Welcome to the second post in the Capcom CPS1 reverse engineering series, you can find Part 1 right here.

    The roots of CPS1

    Everything we know has an origin and predecessors, Capcom's arcade platform CP System 1 is no exception to the rule.

    For many years arcade manufacturers battled for market share in release cycles that saw games burning out of distribution in just a few months. This intense competition demanded manufacturers faster releases and better games in a never ending market race.

    According to an interview by LCSM to Kouichi "Isuke" Yotsui, father of Capcom's hit title "Strider", the Capcom Play System (CPS1) was originally developed with the need to bring better and bigger graphics into new games.

    Isuke: "PCBs back then did not hold an abundant amount of data for graphics. The CPS was developed to free ourselves from that."
    Isuke circa 2011. Source: Striderpedia

    With full 16 bits capabilities, plenty of hardware sprites, tiles and graphic layers, CPS1 extended game asset and code storage capacity beyond its lifetime needs. No game ever released on CPS1 used the 4 megabytes of rom capacity found in the system.

    The availability of the new system sparked the production at Capcom of a new generation of games developed almost in parallel. The three initial titles under development consisted in Daimakaimura (Ghouls'n Ghosts), Forgotten Worlds, and Strider, in that order respectively. In the end Forgotten Worlds made it first to market and got to be the first official CPS1 release title.

    The Chocolate Factory. Capcom's production line, circa 1992. credit: Super Power magazine


    But how did CPS1 and its specs came to be? An early 1990s interview extract from the french magazine "Super Power" seems to confirm the prevalent expert arcade community opinion: CPS1 base specs came straight from a computer commercially unknown to the western world: Sharp's X68000 a.k.a. the god computer.

    Isuke: “I have participated to the development of the CP system and yes absolutely, the X68000 is the base of the CP system."(Thanks to Denis Lechevalier for the interview extract and photos)
    Capcom offices. Circa 1992. credit: Super Power magazine


    X68000: The God Computer

    In March of 1987 Sharp released the X68000 home computer to the Japanese market, a multimedia computer so strong and powerful it had no immediate rivals. The new system wasn't even matched by the highly awarded Commodore Amiga 500 released six months later.

    Sharp X68000

    The X68000 featured full 16 bits capabilities thanks to its Motorola 68k cpu running at 10Mhz, came with 1 megabyte of memory upgradable to 12 megabytes, advanced sound and high resolution hardware graphics with a 65k color palette, a device better than any arcade game platform at the time. Full specs.

    Personally whenever I try compare the X68000 with the humble specs of my first computer back then, the Amstrad CPC 6128, I really feel the X68000 earned its "god computer" nickname well. Indeed a device sent from the future.

    With the introduction of the X68000 Sharp leapfrogged the market in such a way it remained the most capable gaming platform until the early 1990s. Even today the X68000 with its distinct double tower design is still undeniably appealing in terms of aesthetics. PS4 anyone?

    With a whopping price tag of 369,000 Japanese Yens, $2,434 USD in 1987 money or more than $5000 USD in today's money, Sharp sold millions of units in the Japanese market until its final update in 1993. The reasons as to why Sharp didn't release this system outside of Japan are unknown to me, please contribute any information by commenting below.


    According to what is known, Capcom used the X68000 as a benchmark for its CPS1 hardware design and also as game development workstation. Capcom wasn't the only arcade game design company known to have used the X68000 for the production of videogames, for example Toaplan used it to develop games like Outzone, Truxton, and all of their 68000 based releases.

    Capcom's sound and music design team at work. X68000 compact workstation. Super Power magazine.

    Thanks to its involvement in content and game creation and its strong market share, the X68000 enjoyed plenty of pixel perfect arcade ports. Titles such as Final Fight or Daimakaimura (Ghouls'n Ghosts) were released on the X68000 and are still in high demand by todays collectors. Ironically, putting your hands today on a copy of Final Fight for the X68000 will cost you twice as much as the original arcade game board.

    Although commonly referred as a pixel perfect port, ports like Final Fight aren't exactly perfect. For example Final Fight for the X68000 will only display a maximum of four concurrent enemies on screen where as the arcade version will do as many as nine. This is due to CPS1 being more capable in terms of hardware sprites: 256 vs 128.


    The Chocolate Factory Suppliers

    Now we know how Capcom got its base specs for the development of CPS1. How about hardware suppliers?

    Many companies contributed to the making and supply of CPS1 parts, although one particular company contributed the most significant number of them. Hitachi, the Japanese multinational, was the most notable supplier with multiple parts including TTL chips, memories, and the main system CPU.

    Capcom's CPS1 featured the CMOS version of the Motorola 68000 CPU running at 10Mhz (later upgraded to 12Mhz). The CPU introduced in 1985 was a joint development of Motorola and Hitachi after a long term relationship between the companies.

    This special relationship was recently discussed in an interview with Bill Walker, a now retired SVP at Motorola:
    "Our manufacturing practices were pretty bad back then, low yields, long cycle times and poor productivity. In 1978, Motorola and Hitachi entered into a technology exchange venture. We brought a lot back and injected it into our manufacturing and it helped greatly, especially when we built our newest factory in the early eighties. That became the factory that built most of the 68K products – a new 5 inch factory, MOS-8."
    The original CPS1 main cpu: Hitachi Motorola 68000 2-micron CMOS process

    Other significant parts found inside CPS1 boards are the secondary cpu dedicated to running the sound program, a standard Z80 type cpu by Zilog running at a speed of 3.5Mhz, or multiple rom chips sourced from a variety of vendors such as Intel, AMD, Hitachi or Sharp.


    The Graphic Customs

    One of the most intriguing questions we had at the time of starting the reverse engineering effort on CPS1 was identifying who developed the two mysterious customs found on the A and C boards. None of them showed any identifiable manufacturer marks or logos besides the CAPCOM mark and production id numbers.

    CPS1 custom chips, B custom on the left, A on the right.

    In our mind the most probable vendor responsible for these customs could had been Hitachi, not only we knew it to be a high contributor to CPS1 parts, but also at the time of the making of CPS1 Hitachi had a good number of popular custom ASIC products in the market.

    Uncovering the custom secrets and helping the arcade community overcome the popular CPS1 security issues led us to begin the reverse engineering efforts on these customs. Once digshadow got his hands on the CPS1 parts I sent him the wait to understand who was behind the customs came to an end. At his lab and with the aid of a powerful metallurgical microscope the truth got revealed: the vendor of choosing for the CPS1 custom parts was Ricoh.

    Partial photo of CPS-1 custom B-21 under the microscope, credit: digshadow

    This finding went against all our bets, but research revealed Ricoh was in the business of producing a range of CMOS based products including memory products and gate array or standard cell based custom chips. According to specifications found in Ricoh's 1988 product databook, both custom chips found in CPS1 belong to the RSC-15 CMOS standard cell series made with a 1.5 micron process.

    [Update May/13th 2015] Thanks to everyone who pointed out Ricoh is the company behind the original Nintendo NES cpu, a variant of the popular 6502 cpu. More on this here.

    Thanks to this integration effort Capcom introduced plenty of new graphic hardware functions packaged inside these customs, and managed to substantially reduce overall pcb complexity by eliminating legacy parts used in previous designs.

    With them also came a number of security measures that have been a nightmare to today's arcade collectors and a barrier to fully preserve a good number of arcade titles in the CPS1 series.

    This is all for now, I hope you have enjoyed Part 2 of the CPS1 reverse engineering series. On the next post we will explore custom B-21 in detail and discuss how the custom chip got dissected and analyzed. Stay tuned.

    Update: Part 3 now available

    Capcom CPS1 - Part 3

    $
    0
    0
    Welcome to the third and last post in the Capcom CPS-1 reverse engineering series, if you missed any of the previous readings you can find them here:


    Security inside

    As explored during the previous two articles, with the introduction of CPS-1 Capcom developed a couple of graphic custom chips known as CPS-A and CPS-B. These chips unified many graphic functions and allowed Capcom to push its game capabilities further while reducing system design complexity.

    One specific mission of custom CPS-B was security, a characteristic that prevented operators from reusing CPS-1 hardware by simply burning new roms, this was accomplished by featuring a unique internal chip configuration in almost every new game title.

    While early CPS-B chips are truly unique items, with their internal configuration set at the silicon level, the final CPS-B revision known as B-21 was capable of holding any factory configuration by using internal memory backed by an external battery. This helped Capcom simplify its operation by not having to manufacture new CPS-B chips with every new release.

    At production one specific configuration was defined by Capcom for the accompanying game title, and losing power supplied by the external battery means you lose your game, a typical problem faced by today's game collector in preserving working original games.


    Project Update

    $
    0
    0
    Programmer code
    The code needed by the programmer has been made available on the following github account: https://github.com/ArcadeHacker

    Each folder contains the base code for the systems supported by the programmer. Before using your programmer make sure you run the right code for the target system to desuicide. 


    Supported systems*
    Pre-CPS Kabuki Z80 CPU based boards (Capcom and Mitchell)

    CPS1 & 1.5 QSound titles 

    *Important: make sure you read the known issues block further below.


    Building your own programmer
    The base of the programmer consists of two Arduino pieces:


    I/O with the target arcade pcb happens via the 7 pins found just above of the lcd shield right side, look at the Kabuki pdf instructions for further visual reference, tap ground feed from the ICSP connectorhttps://github.com/ArcadeHacker/ArcadeHacker_Kabuki/blob/master/kabuki-instructions.pdf


    Updating your programmer
    In order to update your programmer or switch target systems you need to download the code using the Github mentioned above, look for the .ino files. Once you have downloaded the code just plug your programmer via USB to your computer and upload the right .ino code file using the Arduino IDE. If you don't have the Arduino IDE please download it from the following link:https://www.arduino.cc/en/Main/Software

    Once updated just follow the programmer on-screen instructions.


    Programming instructions

    CPS1 & CPS1.5:
    There's no documented guide yet (pending task), please follow these steps:

    CPS 1 C board pinout as follows:
    Connect programmer pin 3 to CNB pin 61
    Connect programmer pin 4 to CNB pin 62
    Connect programmer pin 5 to CNA pin 19
    Connect programmer pin 6 to CNA pin 20

    Please watch this video to see the whole process in action:

    IMPORTANT: The programmer does not have enough power to drive the C
    board. Watch the video to learn how to piggyback power from the game
    motherboard.


    Known issues
    The following Pre-CPS titles have been reported not to work or have issues with the desuicider: Super Pang, Poker Ladies
    Current behavior: Games start but freeze.

    The following CPS1/1.5 titles have been reported not to work or have issues with the desuicider:  Cadillacs & Dinosaurs, Captain Commando, King of Dragons, Quiz & Dragons
    Current behavior: Some graphic layers are missing.

    Note: Thanks to Corrado, Tormod, Sylvain, and Bill D. for their patience and assistance.


    Next steps
    I'm currently converting one of my CPS1.5 titles into Cadillacs & Dinosaurs to be able to research the issue common to all four CPS1/1.5 games listed above. ETA before I start the research is 2 weeks from now.


    Project pending tasks
    Research and fix all known issues
    Create a project wiki
    Properly document CPS1/1.5 desuicide process

    CPS1 Project update #2

    $
    0
    0
    I have just updated the programmer code on github (link below) adding support the remaining games. You should now be able to program Cadillac & Dinosaurs, King of Dragons, Captain Comando, and Quiz and Dragons without any issues. Thanks to Marcel, Bill D. and Joaquin for their support testing.

    You can download the latest code from the follow site: https://github.com/ArcadeHacker

    CPS2 Project

    $
    0
    0
    The ArcadeHacker project is now officially working to unravel the security mysteries of one of the most popular arcade systems ever: Capcom's CPS2.

    As already delivered with Kabuki and CPS1, the ArcadeHacker project aims to understand the internal workings of the security features inside these systems. Our ultimate goal is help the arcade community preserve games as working originals: No more phoenixes, hardware hacks, or rom replacements.

    Project status
    Some of the CPS2 chip internals are already documented and we are currently dealing with the system main cpu. This gigantic 3 layer IC is taking significant time and resources from us, and is requiring the usage of new lab tools in order to finish the reverse engineering.

    Your support is now needed to help secure and accelerate the project goals.

    How can you help?

    CPS2 samples
    We need CPS2 B board donations in any condition: dead, damaged, phoenixed, no case... it does't matter. Any condition is valid as long as the capcom square chips are in there.

    Please email/contact me for further details if you are willing you send in B board donations.

    Funding
    Attacking the CPS2 chips is a lab time consuming and tool expensive process. If you are willing to donate (any amount helps), please do so by paypal at edcross@gmail.com

    In exchange for your support you will join our list of supporters and receive internal updates about the project status, as well as early access to any desuicide tools generated by the project.

    Thank you all for your support.

    My visit to A.R.C.A.D.E.

    $
    0
    0
    Today I had the pleasure to spend a few hours at this fantastic arcade near Barcelona. As you can see in the video below the selection of machines is fantastic and so was everyone in there. If you are interested in visiting them you can find more information on their website: http://www.arcade.cat


    Important Capcom CPS2 Announcement

    $
    0
    0
    Dear colleagues,

    It is our pleasure to announce a very important milestone in arcade conservation, the successful reverse engineering of Capcom's CPS2 security programming. A major development giving full hardware control of this popular platform over to the community, and helping preservation by enabling the clean desuicide and restoration of any dead games without hardware modifications.

    This achievement has been made possible thanks to the help, support and collaboration of many dedicated individuals who just like you have an altruistic passion about arcade games, their hardware, history and legacy. All the discoveries and results generated by this project will be soon shared publicly, free of charge.

    Over the coming days the project will see a limited release to selected testers to help ensure maturity before the public disclosure happens.

    Stay tuned to further details.

    The ArcadeHacker project
    http://arcadehacker.blogspot.com


    CPS2 project credit goes to: Artemio Urbina, Ian Court and Eduardo Cruz, with the key collaboration of Digshadow, Ougun, Brizzo, Rockman, Tayoken, and the valuable donations by Juan Felix, Alberto Fuentes, Alex Cmaylo, Bill de Leo, Alexander Schütz, François Lefebvre, Tormod Tjaberg, Felix Vazquez and Pau Oliva.
    Viewing all 34 articles
    Browse latest View live