Quantcast
Channel: Arcade Hacker
Viewing all 34 articles
Browse latest View live

Arcade Vintage Video Tour #ArcadeCon2016

$
0
0
Over the weekend I had the pleasure to be a speaker at ArcadeCon2016 and spend a couple of days at Arcade Vintage in Petrer. I was pretty much speechless at what those guys have built, plenty of hard work and passion in there.


More info about this arcade shrine over here:
http://arcadevintageshop.blogspot.com.es/p/visitanos.html

[Mention] Crazy Climber PCB hack

$
0
0
Making your own hardware to expand a game's functionality is a fine skill that deserves plenty of recognition. But doing so while taking the luxury to add artistic elements to your work is a thing only left to the gifted ones.

This is what UKVAC forum member "ajhippel" has done with a Crazy Climber highscore save mod kit, made it memorable by adding demo-scene like music and effects to his work.


More info over here:
http://www.ukvac.com/forum/topic351563_post950717.html#950717

Sample music routine:
https://gist.github.com/ArcadeHacker/44cdf7dc03638c2f271ca8b5b6a77fef

Capcom CPS2 Security Programming Guide

$
0
0
Dear all, after a few months of testing we are extremely happy to release the new clean desuicide / security programing method for Capcom's CPS2 hardware.


This guide is the result of almost two years of work by an small group of arcade enthusiasts to unravel the secrets of the security implementation found in one of the largest and most popular arcade platform systems. Thanks for this work it is now possible to fully preserve any CPS2 systems as original hardware.

Over the coming weeks additional details about the CPS2 hardware internals will be released providing unseen insights into how Capcom implemented security.

Thanks to everyone who has helped test and validate this release throughout the summer, special thanks to Bill DeLeo, Jeremy Walski, Leonard Oliveira and rtw.


Capcom CPS2 Security Programming Guide

This document will guide you through the basics of preparing your setup and testing the new clean desuicide method on any of the known CPS2 board revisions. You can find a pdf copy of this guide and code on the following link: https://github.com/ArcadeHacker/ArcadeHacker_CPS2


What's needed
Arduino programmer hardware


  • Power supply capable of 5 volts @ 1.5 amps or more, eg: arcade or ATX PC power supply.


  • Soldering iron and solder


CPS2 motherboard tools and supplies


Software


Assembling and preparing your Arduino programmer
  1. Solder the 7 pin strip to the top right most socket of the LCD Keypad Shield


  1. Assemble the Arduino Uno and LCD Keypad Shield together


  1. Download and install software for your OS from https://www.arduino.cc/en/Main/Software
  2. Connect your arduino to your PC via USB
  3. Open the ArcadeHacker_CPS2.ino file in the Arduino environment.
  4. Compile and Upload the sketch to the Arduino, next boot sequence should display what's shown below. If you can't see anything you may want to double check the screen contrast setting.


  1. Locate digital pins 2, 3, 11, 12 (top right) and GND (top left icsp connector) on your LCD Keypad Shield. Label them if possible.


  1. Connect the dupont cables to the pinout as shown above. Label them if possible.


Assembling the CPS2 target power cable
Attach two female dupont ends to the female molex power plug.


Identifying your CPS2 B board type
There are several revisions of PCB. These are the relevant ones:


93646B-3:
93646B-3-FRONT.jpg

93646B-4:
19xx_pcb_1.jpg


93646B-5:


93646B-6 and 93646B-7:
93646B-6-FRONT.jpg


97691A-3 (Black case, single board):


Pinout for board revisions 93646B-3 and 93646B-4
CN2 interface pins:


DATAArduino #2→ CN2 A32
SETUP1Arduino #3→ CN2 A30
CLOCKArduino #11→ CN2 A31
SETUP2Arduino #12→ CN2 A29


CN7 power pins:


+5VPower supply → CN7 A25
GNDPower supply & Arduino GND → CN7 A23
GNDPower supply & Arduino GND → CN7 B23


Pinout for board revisions 93646B-5
CN9 interface pins:


DATAArduino #2→ CN9 #2
SETUP1Arduino #3→ CN9 #3
CLOCKArduino #11→ CN9 #4
SETUP2Arduino #12→ CN9 #5


CN7 power pins:


+5VPower supply → CN7 A25
GNDPower supply & Arduino GND → CN7 A23
GNDPower supply & Arduino GND → CN7 B23


Pinout for board revision 93646B-6, 93646B-7 and 97691A-3
CN9 pins:

+5V----------------→ CN9 #1
DATAArduino # 2→ CN9 #2
SETUP1Arduino # 3→ CN9 #3
CLOCKArduino # 11→ CN9 #4
SETUP2Arduino # 12→ CN9 #5
GNDArduino GND→ CN9 #6


Preparing your CPS2 B board
  1. Open the CPS2 B Board plastic case using the Torx Security T20 screwdriver head (the photo below does not apply to revision 97961A-3 "all in one black")


  1. Identify your PCB revision and check the battery voltage


  1. If needed replace the battery with a fresh spare, fit a battery holder when possible


Desuiciding revisions 93646B-3 and 93646B-4
  1. Connect your hooking cables to the corresponding outputs of the arduino programmer (2, 3, 11, 12 & GND)


  1. Connect all pins to CN2 following the order described below.
                                                                                                                                                                
DATAArduino # 2→ CN2 A32
SETUP1Arduino # 3→ CN2 A30
CLOCKArduino # 11→ CN2 A31
SETUP2Arduino # 12→ CN2 A29


GROUNDArduino # GND → CN2 C32


  1. Connect power cables to CN7 A23 & B23 (GND) and A25 (+5)


cps2img.png


  1. Connect the molex connector to the power supply (power supply off!)


  1. Make sure the CPS2 A board and B board are disconnected from each other


  1. Turn on the power supply connected to your CPS2 B board, then power up your Arduino programmer (plug the USB cable to a USB power source, eg: your computer)


  1. Follow the on-screen instructions and program the game configuration you wish to upload. Use the up/down/right/left buttons to advance through the game options.
  2. Once programmed, disconnect power to the Arduino programmer followed by switching off the main power supply to your CPS2 B board
  3. Disconnect all arduino and power supply wires connected to the PCB
  4. Assemble the CPS2 A and B boards together and test for results. If unsuccessful take your time to review your setup before attempting a new keyload.


Desuiciding revisions 93646B-5, 93646B-6, 93646B-7, 97691A-3
  1. Connect the ic clips to the corresponding outputs of the arduino programmer (2, 3, 11, 12 & GND)


  1. Connect all grabbers to CN9 following this order. You can also use a JST NH 6pin connector, pins are part number SHF-001T-0.8BS or SHF-002T-0.8BS depending on your wire gauge.


DATAArduino # 2→ CN9 #2
SETUP1Arduino # 3→ CN9 #3
CLOCKArduino # 11→ CN9 #4
SETUP2Arduino # 12→ CN9 #5
GNDArduino GND→ CN9 #6


capcom.png


  1. [Revisions 93646B-6, 93646B-7, 97691A-3 only] Attach the power cable as shown below. GND connects to the existing arduino grabber.


  1. [Revision 93646B-5 only] Connect power cables to CN7 A23, B23 (GND) and A25 (+5)


  1. Connect the molex connector to the power supply (power supply off!)


  1. Make sure the CPS2 A board and B board are disconnected from each other


  1. Turn on the power supply connected to your CPS2 B board, then power up your Arduino programmer (plug the USB cable to a USB power source, eg: your computer)


  1. Follow the on-screen instructions and program the game configuration you wish to upload. Use the up/down/right/left buttons to advance through the game options.
  2. Once programmed, disconnect power to the Arduino programmer followed by switching off the main power supply
  3. Disconnect all arduino and power supply wires connected to the PCB
  4. Assemble the CPS2 A and B boards together and test for results. If unsuccessful take your time to review your setup before attempting a new keyload.


Hands-on video tutorial by Artemio

https://www.youtube.com/watch?v=ulIi9B74HMs


A Journey Into Capcom's CPS2 Silicon - Part 1

$
0
0
capcom cps2

Capcom's Play System 2, also known as CPS2, was a new arcade platform introduced in 1993 and the company call on bootlegging. Featuring similar but improved specs to its predecesor CPS1, the system introduced a new security architecture that gave Capcom for the first time a piracy-free platform. A fact that remained true for its entire commercial lifespan and that later on it even prevented projects like Mame from gaining proper emulation of the system for years.

Whereas CPS1 philosophy on protection had to do mainly with providing a mechanism to control game pcb conversions, CPS2 instead brought back the focus to cpu code encryption just like its old ancestor Kabuki and Capcom's first go on security. Using a similar approach to Kabuki, CPS2 employs battery backed ram hidden away from user access, once this battery runs out the information needed to run the game is lost with it rendering the game unusable for life.


Enclosed in a plastic shell, CPS2 retains CPS1's characteristic 2-layer pcb assembly style consisting on a base board known as A board, and a game board known as B board. Some later games added additional boards featuring expanded memory and cross-game communication capabilities. The two most important differences of this new generation system are: 1) the A board no longer features the system main cpu, this is now moved to the top B board, and 2) the amount of custom chips as grown considerably as seen in the images below.

CPS2 A base board outside of its plastic shell

CPS2 B top board removed from its plastic shell

A later cost down revision of CPS2 shrank the pcb stack to just one pcb enclosed in a metal black case. Most roms also replaced by a single flash memory module, a technology introduced first in Capcom's CPS3 system in 1996.

"All-in-one" CPS2 cost down revision removed from its case


Encryption meets conservation

First attempts to take control of the platform started circa 1999 by the CPS-2 Shock team, with early emulation following soon in the year 2001 right at the end of its commercial lifecycle. The platform saw one last commemorative game title release from Capcom in December of 2003: Hyper Street Fighter II: The Anniversary Edition, so technically speaking emulation did happen during its commercial life.

A bug found in Capcom's security implementation allowed unencrypted memory dumping on the fly, this discovery enabled the CPS-2 Shock team to retrieve clear program code dumps that led to the production of non-encrypted game rom sets for emulation and dead board "phoenixing", a term used by the arcade community referring to game boards altered to run unencrypted game code.

Thanks to these efforts emulation became possible and countless CPS2 dead boards were converted to run unencrypted versions of games thus saved from hitting the bin.

Capcom's encryption mystery remained a secret for six more years until in 2007 a team composed by Charles McDonald, Andreas Naive and Nicola Salmoria (Mame founder) managed to crack the algorithm via custom hardware and mathematical analysis. Their work revealed CPS2 used two four-round feistel ciphers with a 64 bit key and at this point original code emulation became possible.

From there on the picture for CPS2 hardware owners remained pretty much the same: run out of battery and lose your original game forever, phoenixing your board was the only way out of the situation, but at least it was an option.


Capcom's Customfest

CPS2's use of customs was extensive featuring as many as 11 custom made QFP chips, all of them stamped with Capcom logos. For years the maker, exact nature and purpose of many of  these chips has also been a mystery, something especially true for the ones located on the top B board as many of the A board customs are just a continuation of the ones found in CPS1.

Capcom QFP 160 pin custom chip dated Week 47 1993 

The level of custom integration in CPS2 even touched its main cpu, previously featured in CPS1 as a single Motorola 68000 chip, the arrival of CPS2 saw the 68000 cpu fading away somewhere inside one of the new custom chips, nobody exactly knew which. Another interesting thing about the customs found on the top B board is the fact that they all receive battery power while the board is at rest, an obvious exercise to hide away its security implementation and possible targets.


The widow maker

Present in CPS2 systems since B board revision 5 (93646B-5), this little JST NH 6 pin type connector became over time an item of interest and research by the curious. Its purpose unknown but contained a nasty surprise for whoever was brave enough to mess with it: it killed your board.

CPS2 CN9 connector

This connector brought many questions without answer and one clear result: messing with CN9 suicided your board exactly as running out of battery would do. Why Capcom would include such feature? How was it related to the system encryption? Was it of any real use? or could it just be a distraction?

Over the next series of articles we will explore the inner workings of Capcom's CPS2 security implementation, these findings and discoveries are part of the efforts that led to successful reverse engineering of the system security programming methods late last year: Capcom CPS2 Security Programming Guide.

Stay tuned for more.

A Journey Into Capcom's CPS2 Silicon - Part 2

$
0
0
Welcome to the second post in the Capcom CPS-2 reverse engineering series, if you missed the previous post you can find it here:


Inside the custom chips of CPS2


Capcom's Play System 2, also known as CPS2, was a new arcade platform introduced in 1993 and a firm call on bootlegging. Featuring similar but improved specs to its predecessor CPS1, the system introduced a new security architecture that gave Capcom for the first time a piracy-free platform. A fact that remained true for its main commercial lifespan and that even prevented projects like Mame from gaining proper emulation of the system for years.


Chip Makers

Capcom's extensive use of customs in CPS2 spreads over a total 11 QFP type chips, as part of this project each of the chips were decapped and identified as follows:

A board (Base board)

DL-0311: Ricoh A5C series, standard cells. (Also found in CPS1) Datasheet
DL-0921: Ricoh A5C series, standard cells. (Also found in CPS1) Datasheet
DL-1123: Hitachi HG62F series model 22, gate array. Datasheet
DL-1425: AT&T Digital Signal Processor WEDSP16A-M14. (Also found in CPS1.5) Datasheet
DL-1625: VLSI Technology (VTI) VGT300 series model 022, gate array. Datasheet

DL-2227: Hitachi HG62E series model 08, gate array. Datasheet

CPS2 A Board 93646A-3 Custom chips highlighted


B board (Top board)

DL-1525: Motorola H4C series model 057, gate array in combination with a 68000 cpu megacell (CPM68K REV7-89). Datasheet
DL-1727: Fujitsu CG24 series model 692, gate array. *
DL-1827: Fujitsu CG24 series model 692, gate array. *
DL-1927: Fujitsu CG24 series model 512, gate array. *
DL-2027: Fujitsu CG24 series model 512, gate array. *

* No datasheet available for the Fujitsu CG24 series, please share any.

CPS2 B Board 93646B-6 Custom chips highlighted


Gate Array technology

Used in most CPS2 custom chips, a gate array circuit is a prefabricated silicon chip circuit with no defined functionality, in which transistors, standard NAND or NOR logic gates, are placed following a regular pattern and manufactured on a wafer, this half baked wafer is known as master slice.

Common advantages of Gate Arrays designs over Full-Customs according to TU Delft:

Minimization of the fabrication time: Because the chips are prefabricated (the transistors are already on the master image), the silicon foundry only processes the masks related to metal wires. As compared to full custom layout, the number of masks processed by the silicon foundry is often reduced by more than 60%.

Minimization of the design time: The time involved in designing a cell layout is reduced dramatically (as compared to full-custom) because the transistors are pre placed on the image. Typically, it takes only a few minutes to layout a flipflop or a combinatorial gate, and the designer does not need to know much about the process design rules.

Minimization of the chip cost: The layout design starts with a prefabricated master image. This is a semi-manufactured article that can be produced in large quantities. Consequently, it can be cheap.


Gate Array die size and development time compassion versus other chip design technologies


The Fujitsu gate array chips featured in CPS2's B board belong to the CG24 series and use a 0.8 micron CMOS process. Fujitsu uses a block-level placement and routing scheme commonly known as "fishbone".


Markings inside CPS2 Gate Array chip DL-2027


Unwired section of NAND sea-of-gates inside a Fujitsu CG24 chip

Logic inverter (NOT) implemented in Fujitsu's NAND sea-of-gates

Fujitsu's gate array technology is discussed in more detail in 1978 USPTO patent 4,412,237: https://docs.google.com/viewer?url=patentimages.storage.googleapis.com/pdfs/US4412237.pdf


Capcom's deep pockets

Interestingly enough, several of the B board's chips used by Capcom show a very low utilization of resources being the worst offender chip DL-2027. In IC density terms its contents could be classified as mostly empty space. 

Given the expensive nature of the end to end design and fabrication of these devices one must think that perhaps Capcom's market successes enabled the company not to spare in resources.


Highlighted in yellow total die area utilization inside DL-2027 


The Mysterious CPU


Contrary to popular belief Capcom's CPS-2 cpu does not reside on the A bottom board of the system, the cpu is found on the B board and inside the big 208 pin QFP chip labeled as DL-1525. Mame's own documentation on CPS-2 does not help this belief either as it also states the system cpu is DL-1625, an A board chip.


Capcom DL-1525 dated 1993 week 51 source id JSX02RJ524AU03

DL-1525 hosts inside a massive die measuring around 7x7mm in size featuring a majestic Motorola 68000 megacell core surrounded by a vast 3-layer gate array. This monster IC is based on the Motorola H4C gate array series and uses a gate length of 0.7 microns (700 nanometers). To date it is the smallest feature sized chip I have worked on since I began reverse engineering ICs.


DL-1525 is a Motorola H4C057 class gate array in combination with a 68k cpu core (top right)


Small section of DL-1525 captured at 100x magnification. Three routing metal layers are visible.


Cross-section view of a Motorola H4C gate array describing its composition


DL-1525 Ancestry

A newsletter from Dataquest from May 1988 traces back the origins of Motorola's blending of 68000 cores with gate arrays to the world of laser printers. An extract of such IC industry newsletter reads as follows: 
Motorola is designing gate-array-based interface chips for use in laser printers. The chips will contain a core of the 68000 microprocessor and the dedicated laser printer functions. The LPC-1 will have 5,000 gates and will be fabricated with a 2-micron CMOS technology, while the ALPC-1 will have 16,000 gates and will be the first commercial application of Motorola's HDC series of 1-micron CMOS channelless architecture gate arrays. The LPC-1 is currently available in sample quantities; samples of the ALPC-1 will be available in December, with volume production scheduled for February 1989.

In fact, additional research shows chips with similar source identification marks to Capcom's DL-1525 have been in use in commercial laser printers such as models A258/A259/A260 made by Ricoh. The following parts catalog mentions at least two relevant ICs listed as follows:

 JSC05RR519AU15   208QFP // RICOH IPU BOARD A259 5146 / A260 5146
 JSC05SV519AY17   240QFP // Ricoh main control board A258 5090

Another close brother to DL-1525 is Motorola's own MC68302 "Integrated Multiprotocol Processor" chip. This IC employs a similar gate array and embedding of a 68k cpu core inside. More details about it can be found in the following document.


MC68302 internals description found in "Image Processing For Future High Energy Physics Detectors"

Other chips from Motorola are known to exist with even closer source id numbers to Capcom's DL-1525, their purpose or end product usage are unknown: 

 JSX02RJ514AU17   208QFP // H4C057-68K 
 JSX02RJ524AU03   208QFP // Capcom CPS2 DL-1525
 JSX05PR511AW26  144QFP
 JSX05PR511AW27  No info
 JSX38PG511AJ03   No info


DL-1525 in the wild

Another interesting finding regarding DL-1525 was the availability of chip stock in Alibaba.com marketplace, during March of 2017 and to test its veracity I was able to successfully purchase brand new stock of JSX02RJ524AU03 from a Chinese reseller. At the time of writing of this blog post such stock seems to be still listed on sale online ,and it doesn't seem to be the only Capcom chip being sold on the wild, other chip codes are available to purchase. 

I guess this is of no commercial relevance to Capcom anymore, but it doesn't show great asset control practices.


Two NOS units of Capcom's DL-1525 chip sourced from China, chips dated 1998 week 24

This is all for now, I hope you have enjoyed Part 2 of the CPS2 reverse engineering series. On the next post we will explore how and where Capcom hided its CPS2 security implementation. Stay tuned.

Is Your Gaming CRT Exposing You to X-Rays?

$
0
0
Motivated by this discussion at UKVAC I decided to run a little experiment to find out if your typical gaming CRT leaks any measurable X-rays. Tan while having fun? Let's find out.

Test Setup 

My setup involved testing three tubes in my collection used from time to time for testing arcade pcbs, retro consoles, as well as micro computers. I believe these models are also commonly found among the gaming community and they should be somehow representative.

In front of each tube an X-ray sensor is placed at different distances: 3cm, 30cm, 60cm. X-ray activity is sampled during 180 seconds during each run, then compared against ambient readings (tube turned off).

Initially the X-ray sensor is left to warm up for a good 10 minutes to obtain constant ambient reads.

NEC XM29

Sony BVM-20F1E

Toshiba A68 CRT (NANAO MS9) on a New Astro City cab

The Results

I'm afraid to break the news but... there's no such thing as a free tan while retro gaming. At no time any of the tubes tested presented any abnormal sensor reads indicating the presence of X-rays. To put things into perspective I have included a table below comparing the different scenarios together with reads of the sensor exposed to radiation from a controlled x-ray source.


I'm no expert on this matter, but even if the energies inside the tube are high enough to produce X-rays, the glass in your CRT has lead in it to block those from reaching you. Perhaps someone with enough expertise could confirm these assumptions.

Happy safe gaming.

A Journey Into Capcom's CPS2 Silicon - Part 3

$
0
0
Welcome to the third and last post in the Capcom CPS-2 reverse engineering series, if you missed any of the previous post you can find them here:


Hunting Capcom's Secrets

For many years, finding how and where did Capcom hid away its security implementation has been a pending critical task for the arcade community. CPS2 systems running out of battery were rendered useless forcing collectors worldwide to perform board conversions or let go of their favorite games. 


Typical CPS2 3.6 volts battery made by Hitachi Maxell Ltd in Japan

The battery featured in CPS2 systems is found on the top B board, and it powers a grid that reaches all of the B board customs chips while the board is at rest. During normal operation battery drain is stopped and regular voltage is supplied.

Thanks to Capcom's friendly implementation, battery replacing is a relative safe operation as one is able to switch such battery without fearing instant game death. A capacitor found next to the battery is able to keep things running for a good few minutes until a fresh replacement is soldered. 


Battery voltage measured before distribution to one of the CPS2 custom chips

This grid and the fact Capcom pushes battery power to all custom chips in the board is a deliberate smoke and mirrors exercise in an attempt to deter any curious parties by multiplying the number of possible target chips. 

Earlier security implementations by Capcom such as Kabuki or CPS1 lack this grid scheme and just feature a direct correspondence between the battery and security chip target using it. 


Pulling the string

A clue as to where CPS2 systems hid security came with the introduction of B board revision 5 (93646B-5), from this revision on a little JST NH 6 pin connector was added featuring a number of known and unknown pcb signals. 

Previous to board revision 5 these signals have been found to exist at one of the large base connectors, more specifically base connector CN2.


CN9 as found in CPS2 B board revisions 5 and up


CN2 base connector at a CPS2 B board revion 4

Why would Capcom move these signals into an simpler and more readily accesible connector? If you think in terms of producing, distributing and maintaining tens of thousands of game boards, the move speaks loud of operational and logistics convenience.  Ever scalable, simpler and less expensive processes is a top of mind item for past and present organizations worldwide.

Still a relevant question remained over time: What was behind connector CN9? No game or board feature was known to make any use of it, even worst, any adventurous individuals messing around would quickly find out that playing with this connector ended up mysteriously killing the game. A clear indication about this connector being somehow related to the security implementation of the CPS2 system.


Behind CN9

A quick analysis of CN9 revealed the following findings:


Looking at the list above, pins 1, 5 & 6 carry well known signals involved in the most basic life elements of a game pcb: VCC & GND (Power), and /Reset. Without these it is materially impossible for a game to operate, therefore very relevant signals. 

The remaining pins 2, 3 & 4 don't seem to be driven as no signal is present during operation, most likely inputs with their purpose being unknown. Following the traces for these pins we quickly find them leading onto the adjacent custom chip DL-1827, and no where else. 

Eureka? Time to find out what's behind this IC.

CN9 pins 2, 3, & 4 interface with DL-1827 pins 131, 132 and 69


Inside Capcom's DL-1827

Microscope inspection of DL-1827 revealed a made to order gate array chip manufactured by Fujitsu, more specifically a CG24 series gate array model 692 built on a 0.8 micron CMOS process technology. More information on these chips and gate array technology available on the previous series post. 


Manufacturer marks inside Capcom DL-1827 

Further inspection of the chip logic revealed a shocking finding: DL-1827 is a mere middle-man making no use of such signals. In essence the chip verifies that the board is powered up and drives a passthrough for connector CN9 signals #2, #3 & #4 among several other. The target of such signals entering and exiting DL-1827 is revealed to be the adjacent chip DL-1525.


DL-1827 acts as a passthrough of CN9 signals onto chip DL-1525

The following chart below summarizes how CN9 signals travel until reaching out its destination at chip DL-1525. The analysis discovered that Capcom intentionally used chip DL-1827 to hide away the real security target in CPS2 systems.


CN9 signal journey summary


Inside Capcom's DL-1525

As discussed in the previous post, DL-1525 hosts inside a massive die measuring around 7x7mm in size featuring a majestic Motorola 68000 megacell core surrounded by a vast 3-layer gate array. Inside of this sea of gates one area in particular hosts a large section of memory registers used to store some configuration settings and the game encryption keys. 

A total of 158 bits (1 bit per memory register) are chained together in a serial train to compose the memory block used as part of these settings found in CPS2 security.


DL-1525 Motorola H4C057 class gate array, memory dedicated array area highlighted.

A closer look of the area shows the structures identified as memory registers.

Group of gate array memory registers highlighted in purple and green.

Below, verification of such structures in the simulator reveals the memory registers as D type flip-flops. Top right of the image: 20x chip gate array area capture of a flip-flop memory register.
Top left and bottom images: logic simulation for verification purposes.

CPS2 DL-1525 gate array D type flip flop overview and simulation

Example of how one of the CN9 signals enters the DL-1525 chip: Bottom left in yellow CN9 #3 enters DL-1525 through pin 9 and is driven through a buffer for signal amplification purposes. After that the signal goes straight into the first memory register enable input, then connected to the rest of registers as a series of chains.


Overview of CN9 #3 signal entering DL-1525 through pin 9


Structure of the memory

The 158 bits used in CPS2 security configurations are structured in 4 differentiated blocks. One of them is dedicated to configuration settings while another three contain specific encryption information such as the pair of encryption keys.

From the outside configurations are stored in the chip via serial a protocol in bit reverse order, while the system inside access the information in full parallel mode (all bits at once).

Example CPS2 internal configuration for the game sfz2alh 

As displayed above a number of bits in the first block are of unknown purpose, from here i'd like to invite any brave readers to venture in finding their exact use and functionality.

All information regarding how to write CPS2 security configurations can be found here.


Closing words

Working on unraveling the mysteries behind the CPS2 security implementation has been an amazing challenge and journey for me. I'd like to thank every person that has participated, helped or backed the project in any way, specially to those deeply involved: Artemio Urbina, Ian Court and Digshadow.

The arcade legacy still has a great number of preservation challenges waiting to be addressed that will keep us entertained for while. I look forward to share new and exciting projects with you in the near future.

Eduardo.

Sega System 16 Security Reverse Engineering

$
0
0

Dear all,

I'm glad to announce the successful reverse engineering of Sega's System 16 cpu security modules. This development will enable collectors worldwide preserving hardware unmodified, and stop the general discarding of Hitachi FD modules.

The project is right now involving external testers so expect further details and full disclosure over the coming weeks.

Eduardo.

Project credits: Eduardo Cruz, Rockman (Pere Vicién), Digshadow, with support from Shinichiro Baba, Ricardo Fernandez-Vega, Andrew Welburn and other kind donators.


Sega System 16 / 18 / 24 / X Security Programming Guide

$
0
0
Dear all, after some lengthy testing we are happy to release full details on the security programing of the Hitachi FD1089 / FD1094 cpus used in Sega's System 16 / 18 / 24 / X motherboards.


This guide is the result of several years of work by a small group of arcade enthusiasts to unravel the secrets of the security implementation found in one of the most loved and popular arcade game platforms. Thanks to this work it is now possible to fully preserve most Sega 16 bit systems enabled with security as fully working unmodified originals.

Unlike previous projects this time we recommend the usage of a dedicated pcb to interface with the chips due to the high pin count involved in the programming.

Additional details of the inner workings of Sega's FD security modules will be published over time in this blog. Work on the earlier MC 8 bit modules used in some System 1 / 2 boards and sound of Sega 16 is still in progress and will be published when completed. 

Thanks to everyone who has helped make this a reality including all kind donors and testers.

Sega Hitachi FD1089 / FD1094 Security Programming Guide

This document will guide you through the basics of preparing your setup and testing the a clean desuicide method on any known Sega 16 / 18 / 24 / X board revisions using Hitachi FD1089 or FD1094 modules. You can find a pdf copy of this guide and code on the following link: https://github.com/ArcadeHacker/ArcadeHacker_Sega_Hitachi


What's needed


Arduino programmer hardware


  • Soldering iron and solder

Sofrware


Assembling and preparing your Arduino programmer


This step is pretty straight forward, solder all the pin headers to your programmer pcb as well as the IC 64pin socket. The fully assembled pcb looks like this:


After the pcb shield is ready just sandwich it together with your Arduino Mega 2650.


Download and install software for your OS from https://www.arduino.cc/en/Main/Software
Select the right arduino board type before connecting your arduino to your computer. Tools -> Board -> Mega 2560.


Connect the Arduino to your computer by plugin the USB cable and choose the correct serial port in Tools -> Port. 

Open the ArcadeHacker Sega FD1094 or FD1089 .ino file in the Arduino environment. Compile and Upload the sketch to the Arduino unit.

Open the Arduino IDE serial monitor found in Tools -> Serial Monitor. Configure the two settings found in the lower right part of the serial monitor window as follows: Carriage Return and 115200 bauds. 


Close and open the serial monitor, you should now see the following text on screen. If this is the case you have successfully setup and configured your Arduino programmer. 


Programming security keys


Look inside the Arduino FD1089 or FD1094 code for the game you intend to program the encryption keys into the FD chip and uncomment the desired line of code. Only one game can be uncommented at any time, don't forget to comment the default blank game setting at the beginning of the list.


If the above was done correctly you should now compile and upload the program to your Arduino without problems. Once the upload process is finished open the serial monitor found in Tools. The program prompt should display the game you have configured. 


For this example we have selected "eswat" a System 16 game using the Hitachi FD1094 security module "317-0160". FD1094 security modules can be repurposed for any game and it is not required that a label in the cpu module matches the intended game security key to be programmed. This will not be the case with FD1089 modules as two different encryption schemes exist (FD1089A & FD1089B): A variants of the chip are only compatible with games roms for other A variants, and B variants for B games only.


Having inserted the module in the socket we can proceed to program the security keys by typing w and pressing enter. Make sure you replace the module battery if necessary before attempting a key load, a new battery will last at least 20-30 years so don't expect to have to repeat this often. Once the process finishes you can disconnect the Arduino module from your computer and remove the cpu module.


If you would like to verify that the contents of the cpu match the intended configuration loaded in your programmer you can perform a verification by typing v and pressing enter. This verification compares a 1 bit parity per byte calculated internally by the security module against the encryption configuration in your Arduino. 

WARNING: This verification procedure is 100% safe in FD1094 modules. Unfortunately this is not the case with FD1089 modules as the verification will delete the data inside your module, please do not attempt verification with any valuable FD1089 modules especially if currently undumped or not preserved in Mame. 


Final words


This is all there is to preserving your Sega FD1089 / FD1094 modules as working units, we hope this milestone will help you and the rest of the arcade community preserve your loved games as originals and stop the general discarding of Sega Hitachi modules. 

As mentioned in the opening of this post, a number of follow up articles in this blog will reveal the inner workings and curiosities of these artfully crafted security modules. 

Happy preservation. 

Capcom CPS1 B21 chips in the wild

$
0
0
Do you own any Capcom CPS1 games with a dead or faulty graphics chip? UTsource is holding onto a large new original stock of B21 chips aka DL-0921. According to the listing the stock is at least 86000 units, enough supply for several lifetimes I guess.

To validate the listing I bought a couple of samples and the thing seems definitely real.

NOS Capcom B21 chips as purchased from UTsource.

Calling all Sony BVM 14F1 & 20F1 owners: Your CRT could be at risk of software death

$
0
0

The three chips pictured below found in the BC slot1 board contain key software at risk of preservation unless we act today.


IC3 is a 2mbit flash and contains the cpu code, according to the manufacturer datasheet it has a data retention guarantee of 10 years. IC107/108 are 256kbit eproms containing key system signals, their data inside will last 30-40 years depending on conditions.

If you would like to help preserve these please dump/read these chips and provide me a copy along with your CRT monitor model and year, BC board revision code, and software revision (menu->status). If you don't have a chip reader you can buy the inexpensive TL866II Plus from Ebay, IC3 will dump as AM28F020, and IC107/108 as any 27C256 eprom variant.

My monitor is a 20F1E from 2002, BC board rev A-1135-825-B, software rev 1.40. I have uploaded a copy of the content of my chips here: https://drive.google.com/drive/folders/1RcOjDqqe6G82cl521OmtAqBghIEh3i2x

Thanks for collaborating in preserving such fantastic monitors.


Deconstructing Sega's System 16 Security - Part 1

$
0
0


Sega's System 16 was a new arcade platform introduced in 1986 as a successor to the earlier 8 bit Z80 designs Sega System 1 and System 2. The new system brought in many system upgrades including 16 bit Motorola 68000 CPUs and pioneering security.

Above all System 16 was one of Sega's most successful games platform seeing the release of countless epic games that form part of our collective childhood memories. Among my favorites titles are Shinobi, Golden Axe, Outrun, or Michael Jackson's Moonwalker to name a few, I bet you have yours too.

The platform got subsequent updates and revisions introducing improvements to base specs and integration of chips. The initial System 16A was released in 1986 followed soon by the more common System 16B in 1987, a later revision known as System 18 was introduced in 1989. Specs for all three revisions are as follows:


System 16A specifications

Main CPU: Motorola 68000 or Hitachi FD1089/FD1094 security modules @ 10 MHz
Memory: 16kB + 2 kB
Sound CPU: NEC uPD780C-1 (Zilog Z80) @ 4 MHz
FM synthesis sound chip: Yamaha YM2151 @ 4 MHz (8 FM synthesis channels)
PCM sound chip: NEC uPD7751@ 6 MHz
ADPCM channels: 3
Audio bit depth: 8-bit
Custom GPU chipset: 315-5011 sprite line comparator, 315-5012 sprite generator, 2× 315-5049 tilemap chips, 315-5107 & 315-5108 display timers, 315-5143 & 315-5144 sprite chips, 315-5149 video mixer
Performance: 12.5874 MHz sprite line buffer render clock, 6.2937 MHz sprite line buffer scan/erase & pixel clock
Display resolution: 320×224 to 342×262 (horizontal), 224×320 to 262×342 (vertical), progressive scan
Color palette: 98,304
Colors on screen: 4096 (unique colors) to 6144 (with shadow & highlight)
Graphical planes and sprite capabilities: 2 tile layers (row & column scrolling, 8×8 tiles), 1 text layer, 1 sprite layer. Dual line buffers, double buffering, 128 on-screen sprites, 800 sprite pixels (800.75 sprite processing ticks) per scanline, 100 sprites per scanline, 16 colors per sprite, 8 to 256 width, 8 to 256 height

Fantasy Zone System 16(A) motherboard

Note: a few of the initial System 16 games were released in what's know as Pre-System 16 hardware, this rare system looks pretty much like modified a System1 / 2 pcb.

Alien Syndrome. Pre-System 16 motherboard

System 16B specifications

Sound upgrades
Sound CPU: Zilog Z80 @ 5 MHz or NEC MC-8123 security module
PCM sound chip: NEC uPD7759 ADPCM Decoder @ 640 kHz
ADPCM channels: 8
Audio bit depth: 9-bit
Other features: 8 kHz sampling rate, up to 128 KB audio ROM and 256 samples

Video upgrades
GPU chipset: 315-5196 sprite generator, 315-5197 tilemap generator, 315-5213 sprite chip, 315-5248 & 315-5250 math chips
Sprite capabilities: Sprite-scaling

Wonder Boy III Monster Lair. System 16(B) motherboard

System 18 specifications

Sound upgrades
Sound CPU: Zilog Z80 @ 8 MHz
Sound chip: 2 × Yamaha YM3438 @ 8 MHz + Ricoh RF5c68 @ 10 MHz (8-channel PCM chip, remarked as Sega Custom 315)

Video upgrades
Graphics chips: Sega System 16B chipset, Yamaha YM7101 VDP
Colors on screen: 4096 (unique colors) to 8384 (with shadow & highlight)
Graphical planes and sprite capabilities: 4 tile layers, 1 text layer, 1 sprite layer with hardware sprite zooming, translucent shadows, sprites of any height and length.

Michael Jackson's Moonwalker. System 18 motherboard


Sega meets Hitachi

With the introduction of System 16, selected games replaced the main system 68000 CPU with secretive Hitachi branded device modules, these modules were Hitachi FD1089 revisions A and B, and a more commonly found Hitachi FD1094.


Pictured a couple of HITACHI modules used in Sega System 16 game boards


Most modules feature a sticker with a seven-digit code unique per game title and region. For arcade operators or collectors trying to replace these modules with a regular 68000 CPU or a different Hitachi module, this would result in a non-working game. A battery inside also plays a fatal role, losing its power renders the module unusable.

In combination with encrypted roms the modules provided Sega with a way to control piracy and stop unauthorized board conversions (when a game base system is reused for a different game).

Sega's work with Hitachi was no coincidence, at the time probably no other company in Japan would have the expertise, technology, and rights to be able to produce custom 68000 based modules. Early on Hitachi helped Motorola, the company behind the 68000 CPU, overcome critical manufacturing challenges and achieve repeatable production of the new CPU. In exchange Hitachi was allowed to second source 68000 CPUs under the Hitachi brand.

Hitachi's work with customer modules was not limited to Sega game systems, different modules for different customers were also produced over the years. Here's a few examples found on the net:

FD1095 a custom module close numbered to Sega's FD1094, its purpose or nature is unknown


Several HITACH FD modules found online

Some of these modules can be bought online at present time, in fact, IC supplier Kynix has an active listing selling Sega's FD1094 stock, to verify the validity of the listing I purchased a lot which turned to be right. The modules seem to be refurbished as some of them still contain valid game data and are visibly used.

FD1094 modules purchased from Kynix

Inside the modules

Over the next posts we will discuss the internals of the FD1089 and FD1094 modules, reveal their construction and facts of interest.

Stay tuned.


Deconstructing Sega's System 16 Security - Part 2

$
0
0

Sega's FD1089 security module reverse engineering

The FD1089 module variants from Hitachi / SEGA were fabricated in a plastic case, on the back of the module a epoxy layer is visible together with two rows of pins arranged as DIP64. This arrangement mimics a standard 68000 CPU as intended by SEGA.

The sample shown below features the SEGA code 317-0013, this indicates the module was used as part of a Enduro Racer game board.


As is, the module measures 8.72cm by 2.85cm, not a small piece for a cpu.


The plastic case features a top cover providing access to the battery container, as shown below as many as three batteries could be fitted at once, perhaps allowing for longer data retention configurations. All modules I've seen myself just make use of one battery slot only.

Hitachi seemed to keep all things home by employing Hitachi Maxell CR-2032 3 volt batteries. This one was dated 1986 week 06, long enough!

For some reason a white looking dust was found inside all over the battery container, a battery byproduct over the years?

Lastly, there's a big letter B stamped, this corresponds with the specific module type under review: FD1089B. Modules A stamped inside correspond to FD1089A variants.


X-ray glasses on so we can see what it looks like inside, this is one of the fun parts of the project. For the first time you have a look inside and start trying to make sense of the internals, this one is busy and is no standard IC on a package. Time to start planning an attack.


In order to try gain clean access inside we test the epoxy with a strong paint remover for a few days.


Unfortunately this didn't produce any significant results, the epoxy in the FD1089 is well formulated and is resistant to this type of attack.

By employing a combination of heat and patience it is possible to separate the plastic case from the epoxy block.


A weak spot on the epoxy curing caused by trapped air is discovered, this allowed for a unique early view of the shinny internal pcb as shown below. 


Time to keep going deeper and plan to attack the epoxy, first a few measurements are made to understand dimensions whenever needed later on. The epoxy block on its own does 8.49cm by 2.60cm.


With the help of higher resolution x-rays we start to get full control of what's going on in there, eg enumeration of devices, guessing the purpose of each device, producing early diagrams, etc...

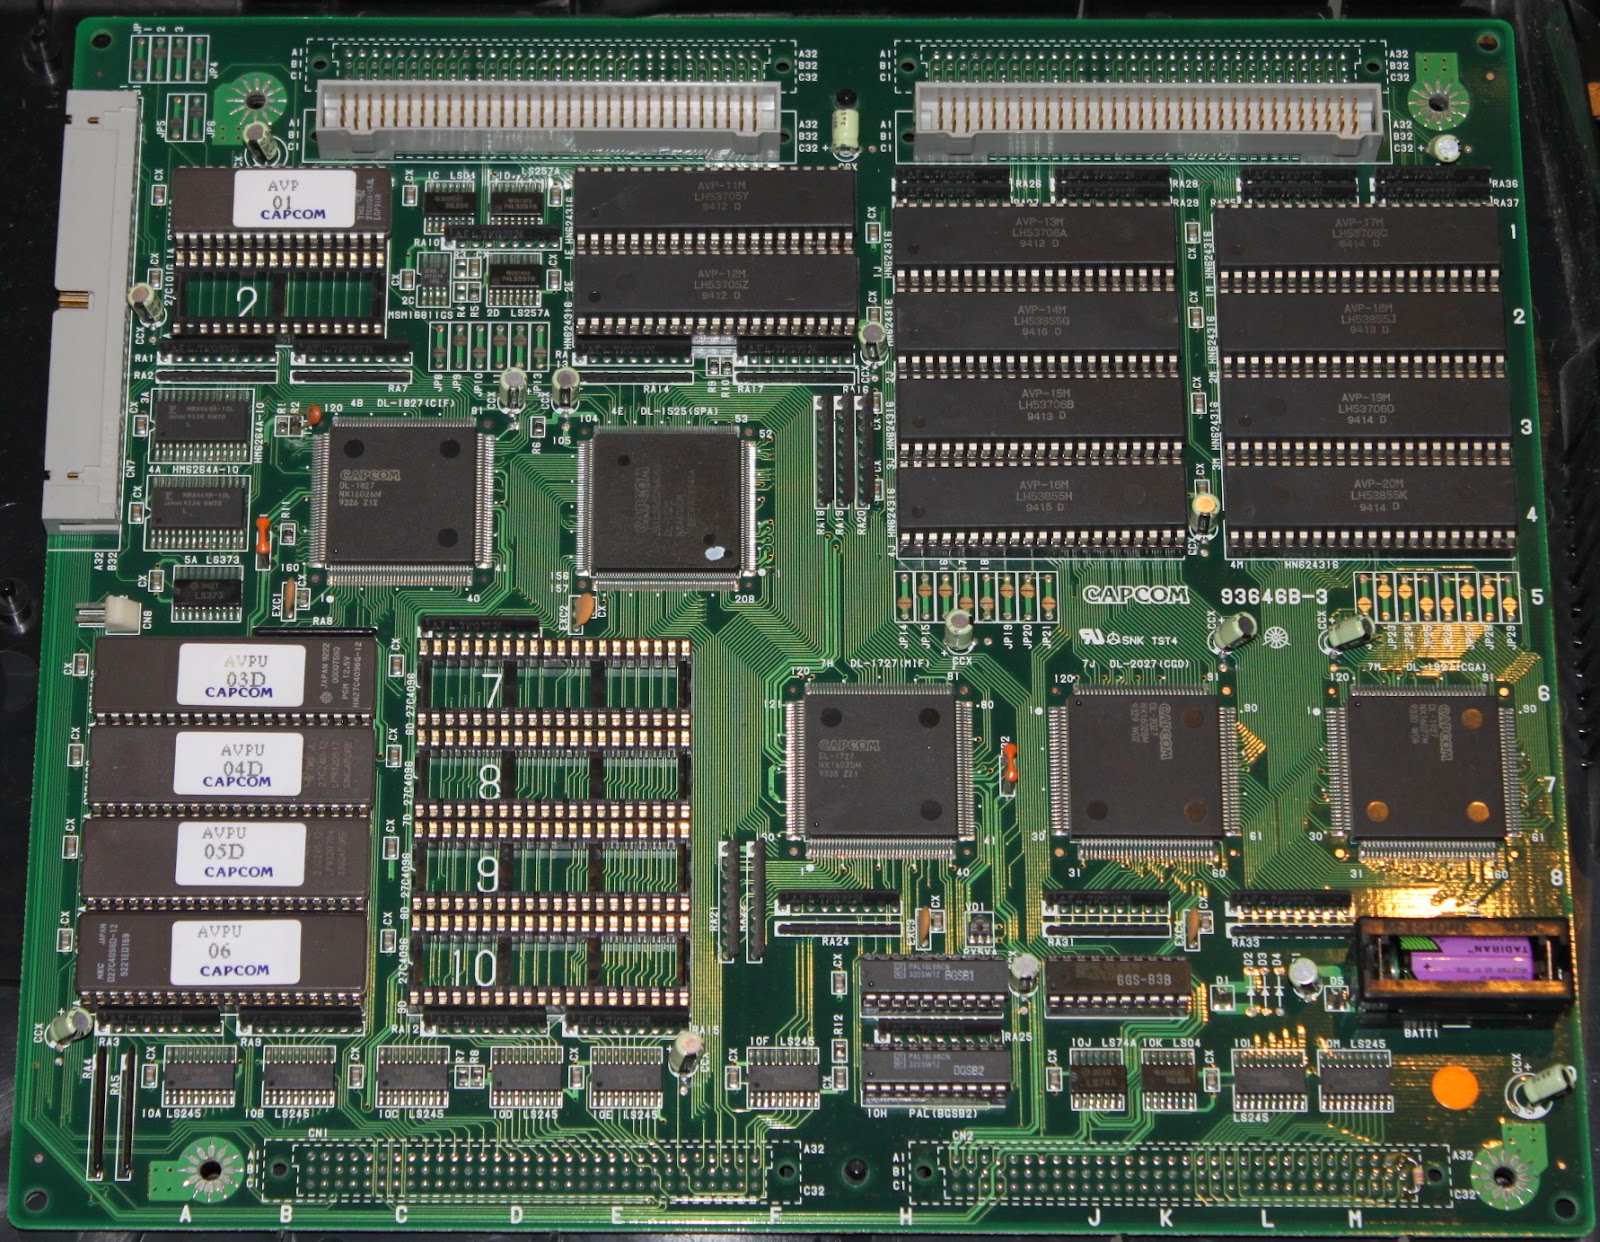
As shown below, the FD1089 uses a total of four different chips in its operation. left to right: A custom IC (this is where the security magic happens), a 68000 CPU, a 6264 SRAM chip, and a MB3771 voltage monitor (when needed, this takes care of switching power from VCC to VBATT and vice-versa). 

The first three chips are HITACHI bare dies directly glued onto the top of the pcb, the MB3771 is in full form as a surface mount device soldered on the back of the pcb. 


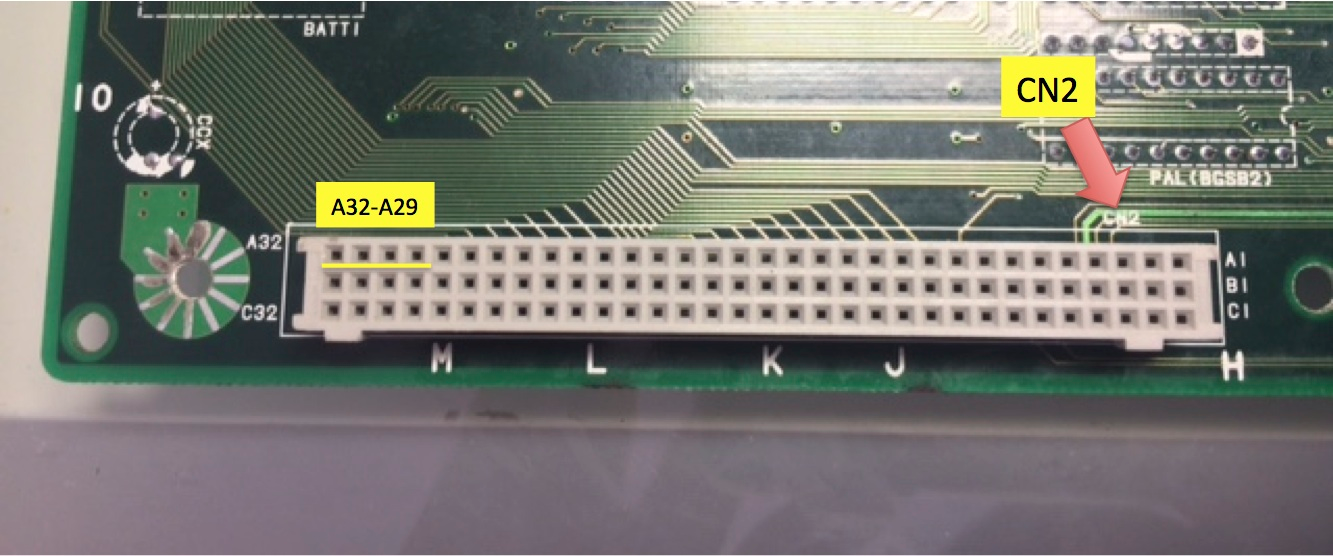
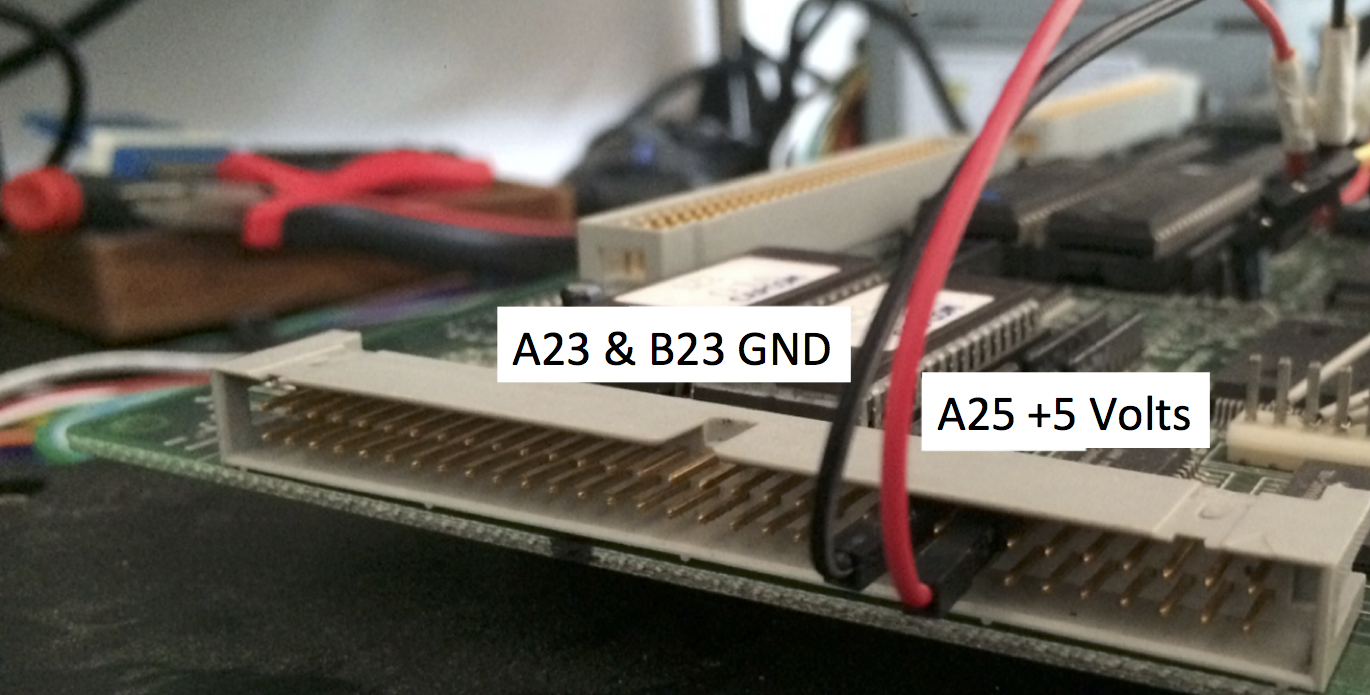
Next, we need to have a fully validated understanding of the internal interconnect (aka, how things connect to each other and the outside)

The tool of preference for this project was a precision CNC, nothing fancy, just a standard Aliexpress sourced kit. The goal here is precise enough milling so we reveal the circuit while avoiding fatal damage to the interconnect and chips, especially the custom IC.


Hours later, a significant part of the the copper surface is fully exposed and the custom IC preserved in place, though this didn't come without surprises and a couple of drill bits broken. Just below the IC you can see another unexposed rectangle area, this happened to be a ceramic insert placed there during fabrication to protect access to a sensitive area of the module


At this point a further donor module got dremel down bare to understand how many more ceramic inserts were there, in total the FD1089 module has four ceramic inserts, two on the front and two on the back shown below in white, they protect key SRAM signals such as the data bus to prevent extraction of the encryption key through direct drilling.

At this point I was convinced this module was probably very expensive to produce back in the day.


For illustration of the above lets take the following example and visual representation: Four data bit vias from the SRAM are covered with ceramic both at the origin near the SRAM as well as at the destination close to the custom IC.

Beyond being cool and almost a craft, not sure why this was done, if an attacker could drill from above with the intention of making contact, it could do so at other parts of the circuit by exposing the copper, you don't require a via specifically for that.


More hours of careful drilling allow us to gain access to further key areas of the pcb, when this process is completed we can work on the next part of this reverse engineering.


Diagraming the interconnect and how chips relate to each other is a critical step before we proceed to examine any deep down chip logic.


Once we are ready to explore the custom chip, a further donor unit is put under the knife, the goal here is to cut down the minimum possible sample to allow extraction of the custom IC die housed inside.


Bonus: a cross section of the pcb reveals its four layers, the inner two are dedicated to VCC / GND distribution only.


The smallest possible bite size sandwich is produced, inside not visible is the custom IC, left you can see in white a couple of the ceramic inserts guarding access.


The sample was then put in a nitric acid beauty spa for several rounds.


At each round the sample was inspected for progress and cleaning. IC dies are very fragile and patience is key, this waited 30+ years, so it may as well wait another day if necessary. 


Finally getting closer, both ceramic bits are released, below them you can see the back of the IC die now exposed.


A final round allowed for the chip die to be fully exposed clean. Pharaonic honors please.


Stay tuned for the next article, we will explore this chip under the microscope. Happy reversing.


UM3481A Series - Multi-Instrument Melody Generator

$
0
0
The UM348x family of sound generating devices is currently unemulated mainly due to a lack of understanding of the chip internal rom structure and data.

The sound of these devices should be familiar to many of you as they have been broadly used in many 80s and 90s low end gadgets, doorbells, etc. Bootleg arcade games have used these chips as a way to integrate music at a minimum cost.


Each chip contains a fixed number of melodies hardcoded in the silicon during manufacturing.

Sean Riddle and ClawGrip have made extensive efforts to document these devices, full decap images, sound recordings, and main mask rom dump available for UM3481A and UM3482A here: http://www.seanriddle.com/um348x/


The following notes taken during my analysis of the mask ROM array structure:

Overall view of the UM3481A chips internals with metal removed. Mask ROMs highlighted. 


Zoomed structure view of the main internal mask rom, metal removed.


To obtain usable data, individual bits from each bank are grouped together to form 7-bit words. 


The resulting data consist of 8 banks of 7 bit words containing the melody information. The pattern 100011 marks the beginning of the data space, this pattern is also used at the very end in any unused remaining space. Perhaps it resets the oscillators to not generate sound.


The word pattern 000011 signals the end of every melody. The UM3481A chip contains 8 songs, therefore we find 8x 000011 words in the data. 


The eight melodies occupy the corresponding space according to their length, melody #6 is the shorter of them all by far. 


These lengths are also observable in the WAV, the recording matches all observed melodies in the mask rom.


Most notes seem to take just one word, here's an example from the first UM3481A melody "Jingle Bells", in the song three notes repeat almost at the very beginning, this is clearly visible in the data itself. 


Longer duration notes seem to take two words, in the following example also from the beginning of "Jingle Bells",  two longer duration notes are played after the initial repeating single notes.


That's all from my observation notes, I hope the better understanding of the data structure helps the emulation of this family of sound generating devices. 


Viewing all 34 articles
Browse latest View live